Today, using the Internet has never been easier. Now that most places incorporate Wireless Internet, you can just turn on your computer, click “Find A Network” and then you are connected! It is one of the easiest things to do.
Unfortunately, with this comes the ease of losing our privacy. While there are many ways to protect your privacy while using the Internet (such as Firewalls and password protection), more and more people are setting up proxies on their browsers.

What Is A Proxy?
A proxy is a short term for “proxy server”, in which the user sets up another server and uses it to communicate through the Internet.
It’s similar to using a telephone, where you have one person trying to talk to another person, but they are using a third party (which would be the telephone).
Using this method protects people’s privacy by giving them anonymity. Just like a physical telephone can hide your identity in the real world, a proxy can hide it on the web.
So a web browser can continue to use the Internet like normal, but any person or website on the other end will only have contact with whatever info gets sent to the proxy and can only see the proxy’s information, as opposed to the web user.
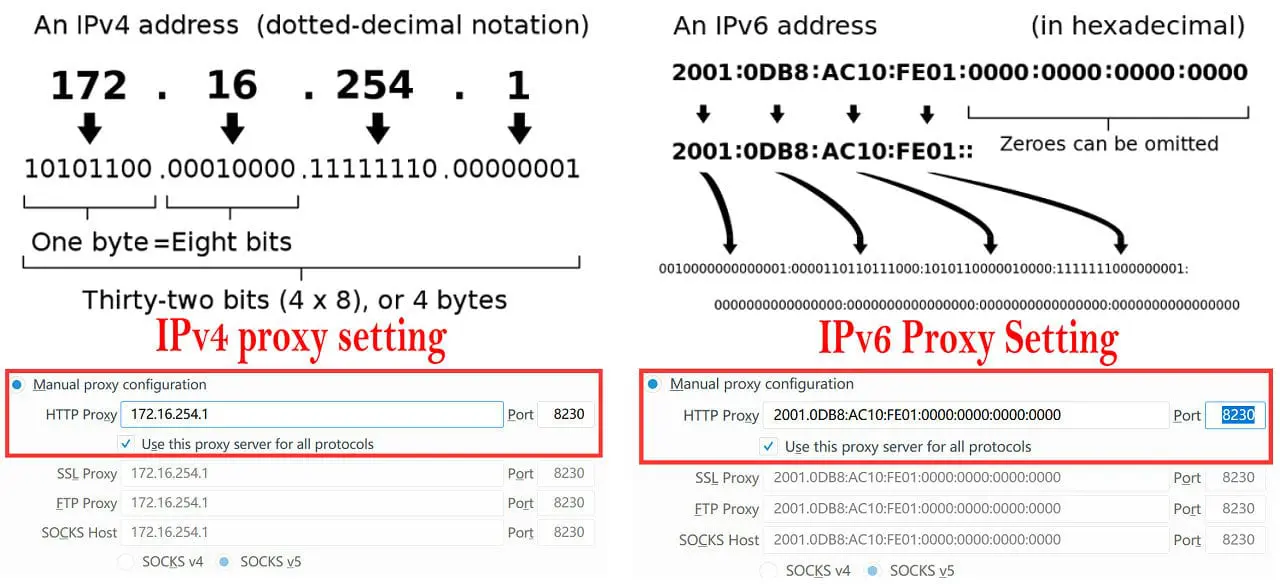
A Proxy server usually as IP:Port, some of residential proxies providers may be offer the proxy as Host:Port.
And It's no much different to set up the IPv4 Proxies and IPv6 Proxies.
How Do You Set Up A Proxy On A Browser?
If you decide you want to set up a proxy, it is not a difficult thing to do. However, the process varies depending on what browser is being used. Below are the instructions for setting up a proxy server on the top five most used web browsers:
Proxy Set-Up Using Google Chrome

1. First you want to find the Control Panel under the Start Menu in Windows, then go ahead and select Internet

2. Find the LAN settings button after you located and select Internet
3. Select the box next to Use a proxy server for your LAN. Once that is done, you can enter proxy IP addresses and
4. When finished, select OK to save.
Proxy Set-Up Using Firefox
1. Start by opening Once open, go ahead find Options under the Tools tab.
2. Once in Options, select (or typing “about:preferences” in address bar)

3. Click on the Network tab, and then select
4. Under Settings, look for the button called Manual Proxy Configuration.
5. Once here, type any proxy server’s IP address under the HTTP Proxy field and any proxy port under
6. Check the box Use this proxy server for all protocols and then click.
Proxy Set-Up Using Safari
1. First, open up Under the tab labeled Safari find and click on Preferences…
2. Under Preferences, select Advanced. Once in the Advanced menu, look for Proxies then select Change Settings…

3. Under Change Settings, a separate window will pop up named Internet Find LAN Settings and select it.
4. Once you click on LAN Settings, a window be pulled up that says Local Area Network (LAN) Once here, go ahead and select the box in Proxy Server block.

5. Once you do this, Port and Address rows can be altered. Once you’ve made your additions or changes to both, select Close all open windows and Quit Safari.
6. The next time you open Safari, your new settings will be in.
Proxy Set-Up Using Opera
1. When using Opera, you can find the Proxy server settings under Tools, then by clicking on Preferences, then the Advanced button, and then
2. If using Opera on a Mac, open Opera, then select Preferences, then click on the Advanced button, and then
3. Click on the Proxy servers button to find the Proxy
4. Once under Proxy Settings, you can select the specific protocols you want to use and then enter the server’s IP address. To make any changes to the port number, look for a box on the right-hand side of the Protocols.
Proxy Set-Up Using Internet Explorer
1. Open Internet Once it is up and running, look for Internet Options under the Tools drop-down menu.
2. Select Connections, and then hit the LAN Settings button (this is found all the way down at the bottom under LAN Settings Section).
3. Once there, find Use a proxy server and click on Then select Advanced.
4. Under Advanced you can enter the proxy IP address and port in their respective
5. Once that is done, hit Use the same proxy server for all protocols and finish by selecting.
Conclusion
Now that you know how to set up proxy servers in the more popular web browsers, you can now continue to browse the web a little more securely.
Using this technique, combined with a few other security measures should put the average Internet user more at ease when it comes to their identity and privacy.