Are you new to Beautifulsoup? Then read the article below to learn how to use it for extracting data from web pages. we provide an up to date step by step guide to make it easier for you.
TL;DR – Basic steps to use BeautifulSoup for web scraping in Python.
BeautifulSoup is a Python library used for web scraping purposes to pull the data out of HTML and XML files. Here are the steps to use BeautifulSoup for web scraping:
- Install BeautifulSoup: Use the command
pip install beautifulsoup4in the terminal or command prompt to install the BeautifulSoup library. - Import Library: Import the BeautifulSoup library and the requests library in your Python code with the following code:
from bs4 import BeautifulSoup

import requests
- Send HTTP Request: Use the
requests.get()method to send an HTTP request to the URL of the webpage you want to scrape, and store the response in a variable.
response = requests.get('https://www.example.com')
- Parse HTML: Use the
BeautifulSoupfunction to parse the HTML content of the response and store it in a BeautifulSoup object.
soup = BeautifulSoup(response.text, 'html.parser')
- Extract Data: Use methods such as
find(),find_all(), andselect()to search for and extract the data from the HTML content.
title = soup.find('title').text
- Save Data: Store the extracted data in a variable or write it to a file for further processing.
There are basically two steps to web scraping. The first step is to send a web request to get the HTML of a web page while the second step involves parsing out and extracting the required data from the HTML downloaded.
Our focus in this article is on the second step – extracting data from web pages. As a Python developer, you will agree with me that the standard parser that comes included in the standard library is nearly impossible to use except if you have advanced knowledge.
this lead to the demand for simpler alternatives and Beautifulsoup for now, is the number one library for extracting data from web psge document. It is mostly used along requests but sometimes, developers use it with Selenium too. This article will show you how to use Beautifulsoup for extracting data from web pages.
What is Beautifulsoup?

Beautifulsoup is a python web scraping package that allows the parsing and scraping of HTML and XML pages and document. It is quite a diverse tool in terms of extracting data as it can separate what is on a webpage with only a few lines of code from your end.
If you are a python programmer who primarily works with web scraping, you can imagine how time-consuming the job would be if the right tool was not available; this is one of Beautifulsoup's distinguishing features. It is important you know that this library is not a parser in itself.
It makes use of a parser such as the standard HTML. Parser or even a third-party parser like the lxml. Before extraction, the Python parser interprets to ensure that all syntax makes sense, and when BeautifulSoup is used for extraction, the data is converted to the desired file type.
The three major functions that encompass the usefulness of this python scraper are that it is capable of extracting, navigating data, and filtering the values of the content of a web page document.
Parsing a Page with Beautifulsoup
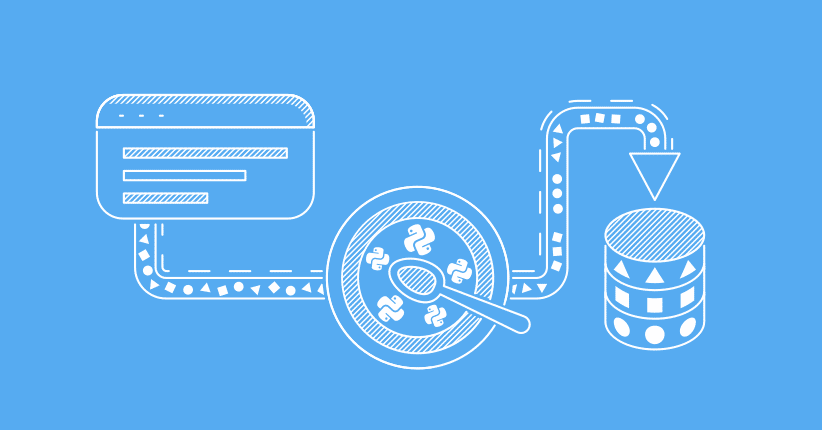
Parsing is the key functionality to understanding how to use Beautifulsoup in python web scraping. In this section of the tutorial we will be showing you what’s involve in parsing a page with Beautifulsoup. Before doing that, you need to have Python installed. we highly recommend you install the Pycharm IDE for this tutorial. there is a community edition that you can use for free.
Downloading and installing PyCharm
Before downloading PyCharm for coding Python, it is important to make sure you have Python installed on your computer, especially if you are new to programming in this language. To install Python, follow these quick steps below.
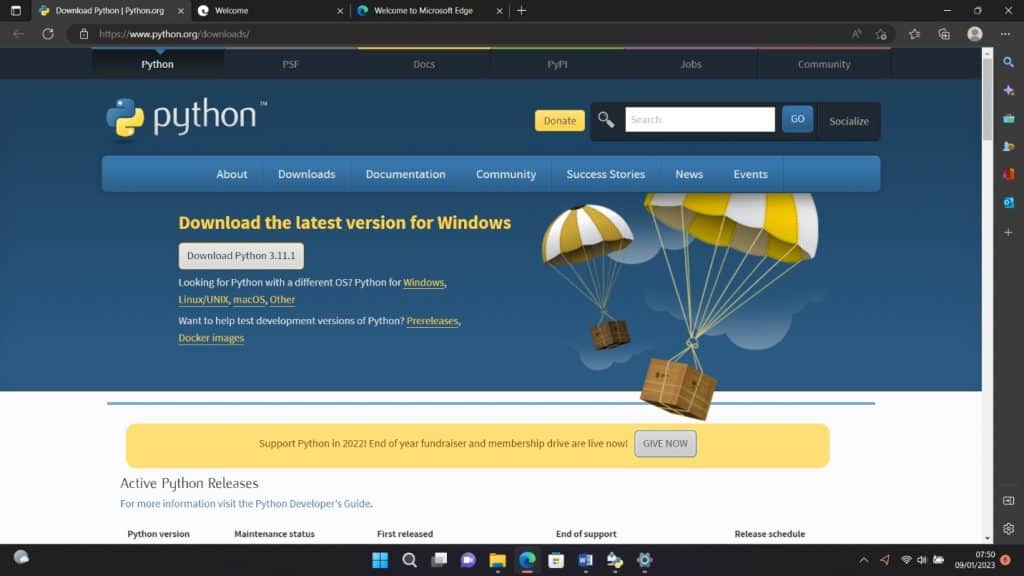
Step 1: Visit the official Python website, here. There are different versions to choose from. We suggest you go for the latest version, as we will be using that for this tutorial: Python (version 3.11.1).
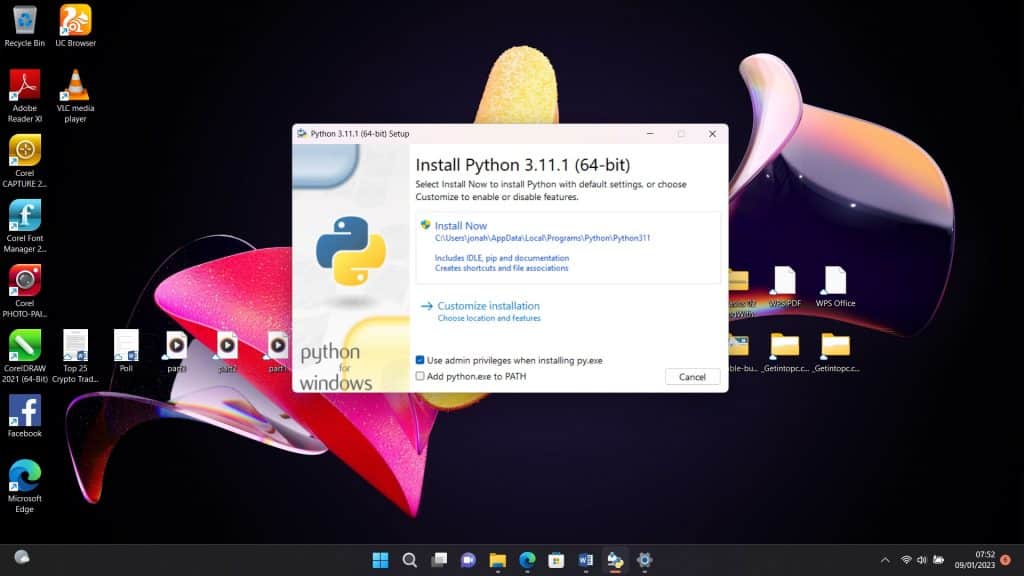
Step 2: When you are done downloading, run the downloaded.exe file by clicking “Install Now” to install it on your machine.
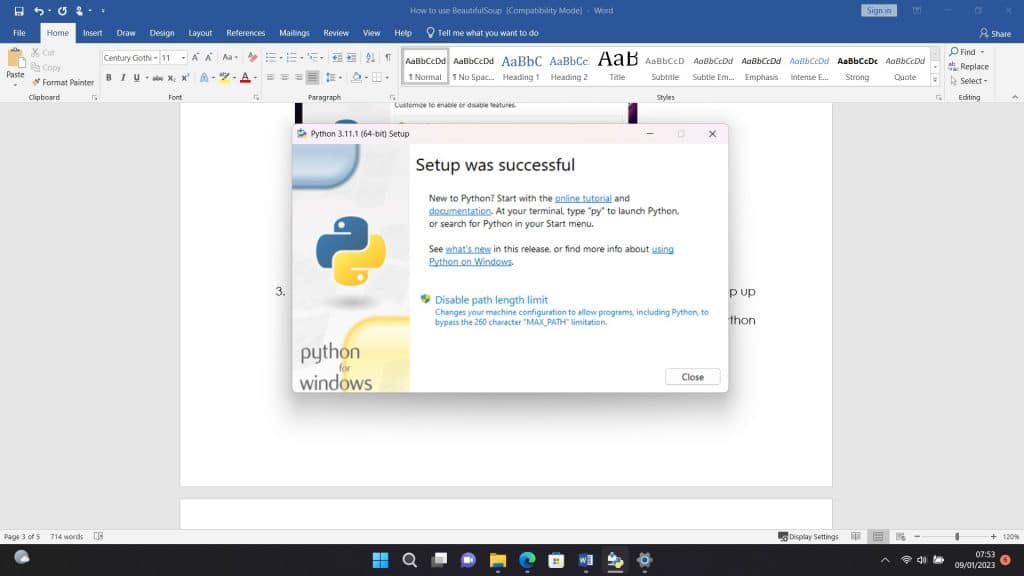
Step 3: When the installation is done and successful, you should see a dialog box pop up like the one below. Click Close to shut down the dialog box and finish your Python installation.
The next step would be to download and install PyCharm as well.
Step 4: To download PyCharm, visit here.
Step 5: You should see the options to download either the professional or community version. Depending on which one you want, go ahead and click the download button. At the time of writing this article, JetBrains is offering a 30-day trial for the professional version of PyCharm.
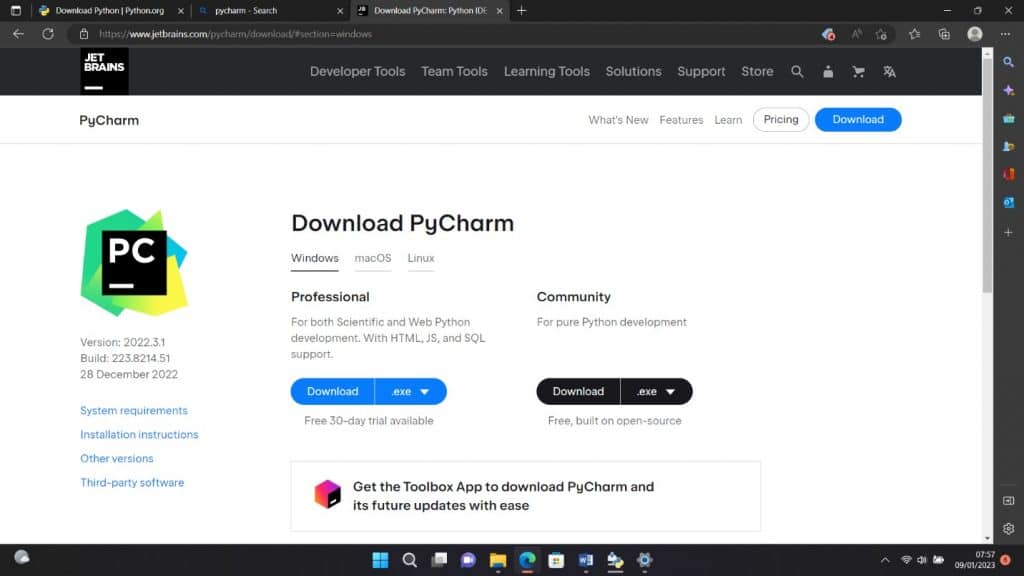
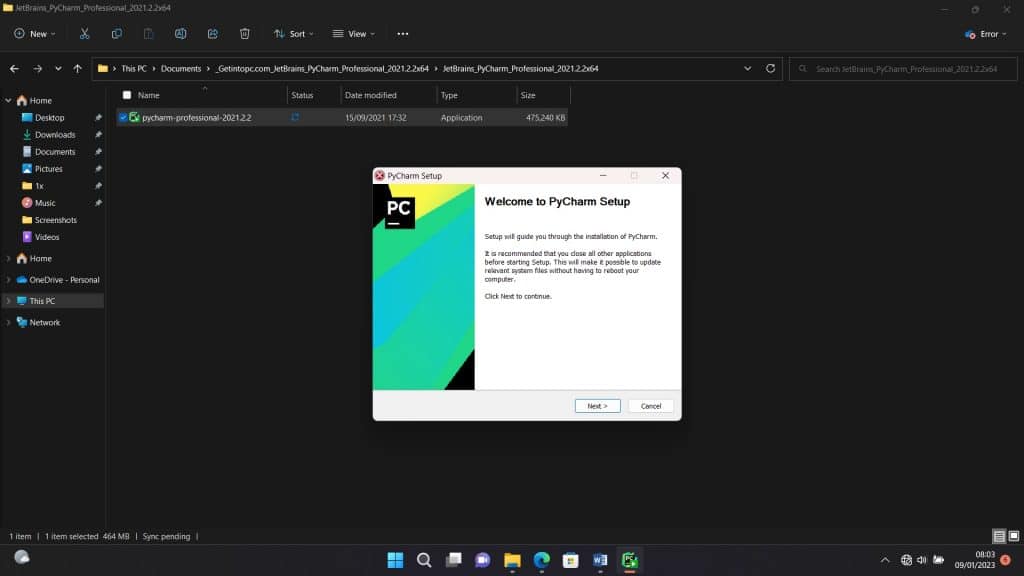
Step 6: After downloading, run the.exe file to begin installation. Click Next when you see the setup wizard pop up.
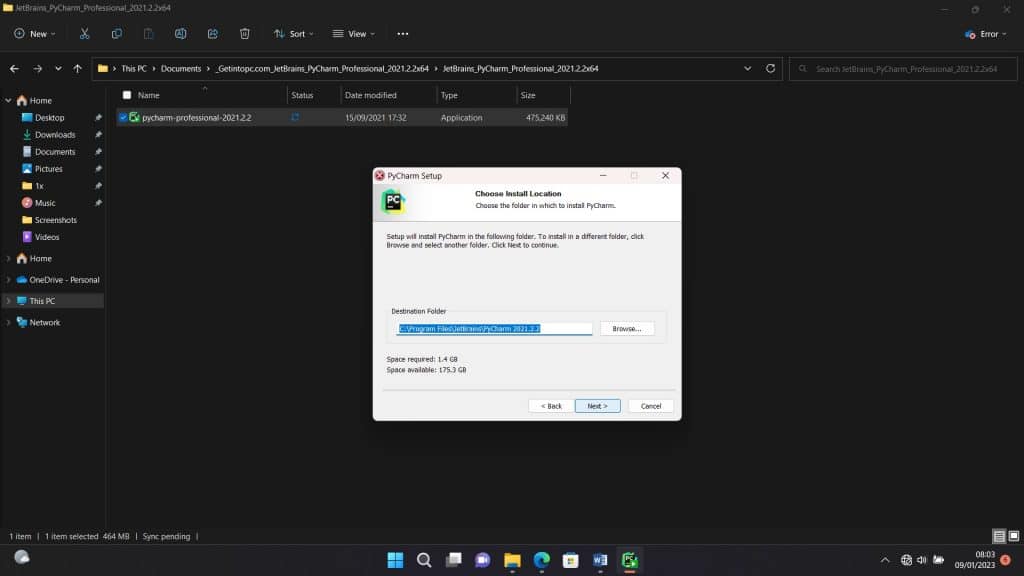
Step 7: The following window would show the path to where PyCharm would be installed. If necessary, you can alter the path. Click Next to move forward.
Step 8: You would be given the option to create associations, a desktop shortcut, a context menu update, a PATH variable update, or all of these in the following popup. To proceed, select the choices you want and click Next. You may continue without selecting any boxes.
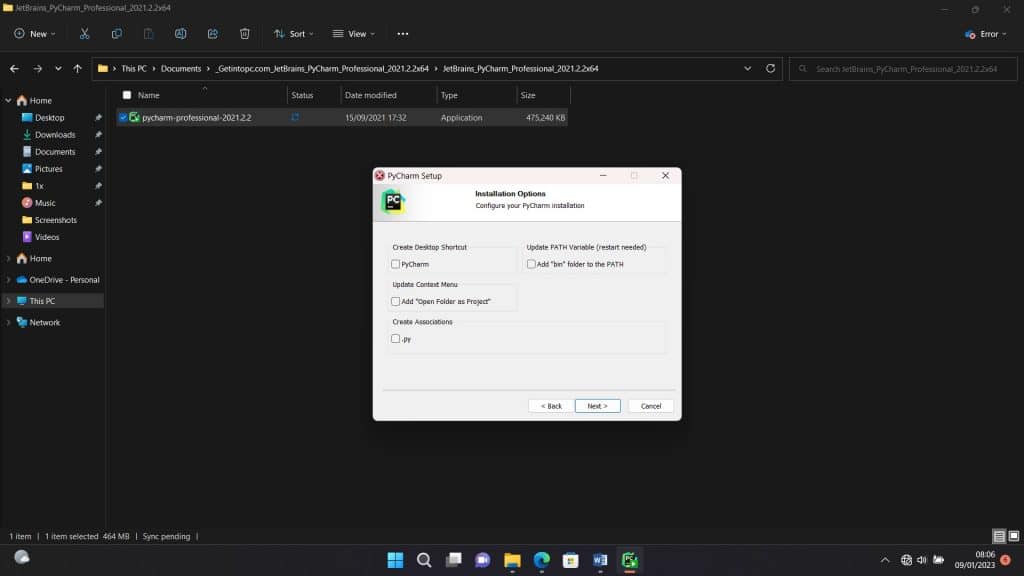
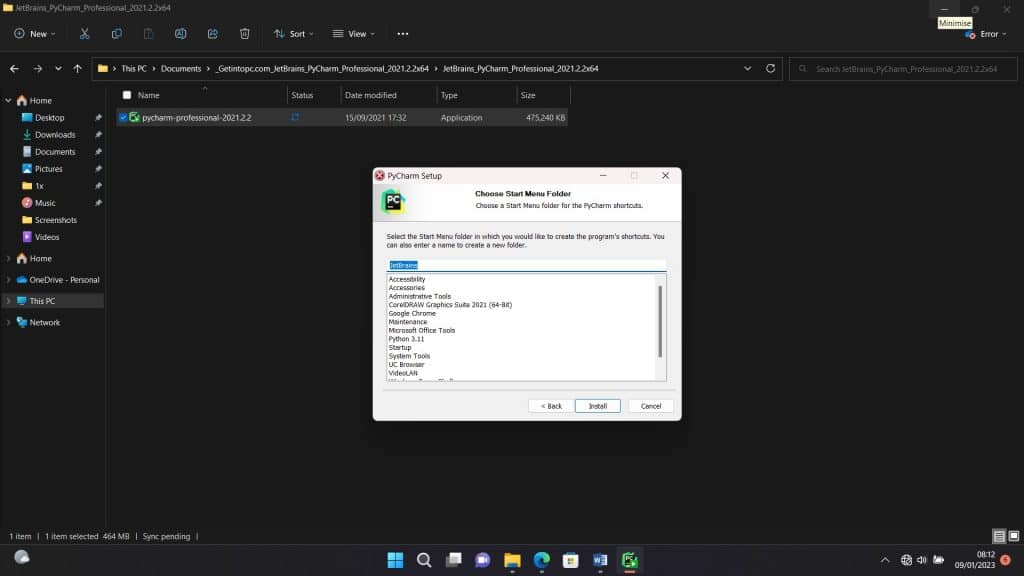
Step 9: After this, select your start menu folder. By default, you should see JetBrains. You can leave it like that and click Install.
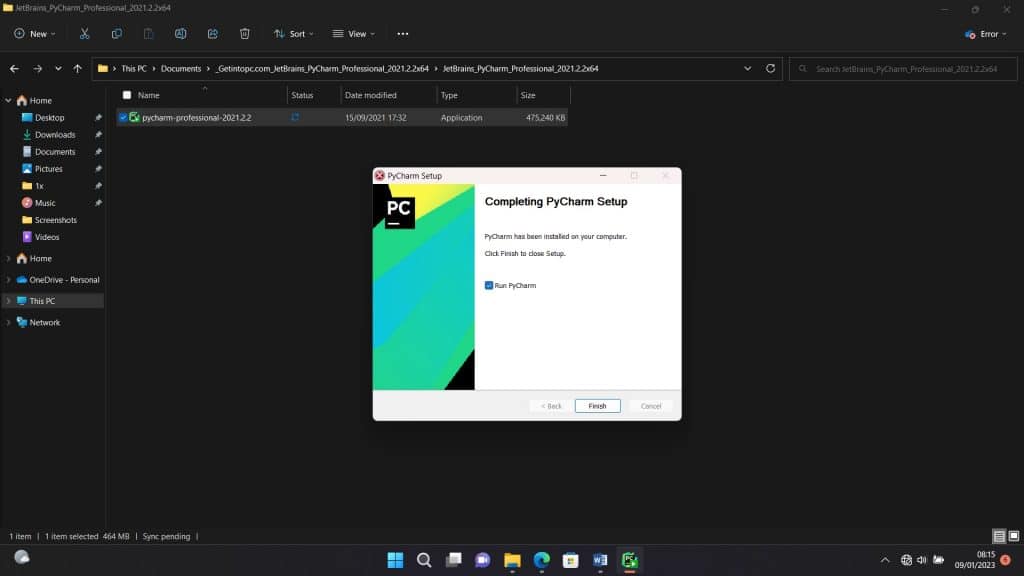
Step 10: Wait for some minutes for the installation to complete. When it is done, you should see the next window like the one below. You can tick the box right next to Run PyCharm and click Next to launch PyCharm right away.
That’s it. We are done setting up the Python IDE we need. Let’s move on to installing the beautiful soup library we need for this tutorial.
Installing BeautifulSoup
Now that the installation of Python and PyCharm is complete, click on Create New Project to start writing your codes and, most importantly, install the beautifulsoup library. The PyCharm window should look like this.
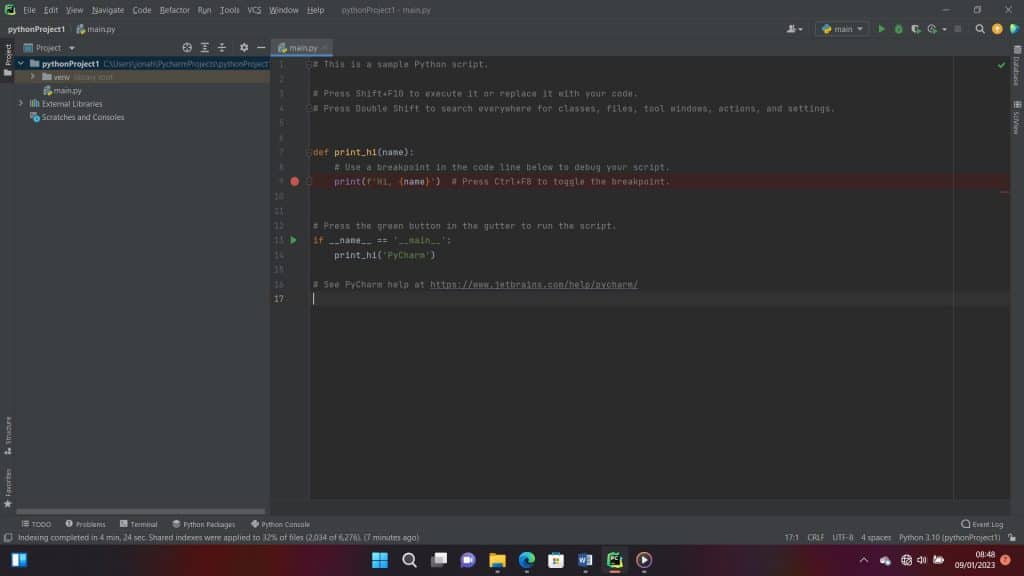
Follow the instructions below to begin installing Beautiful Soup:
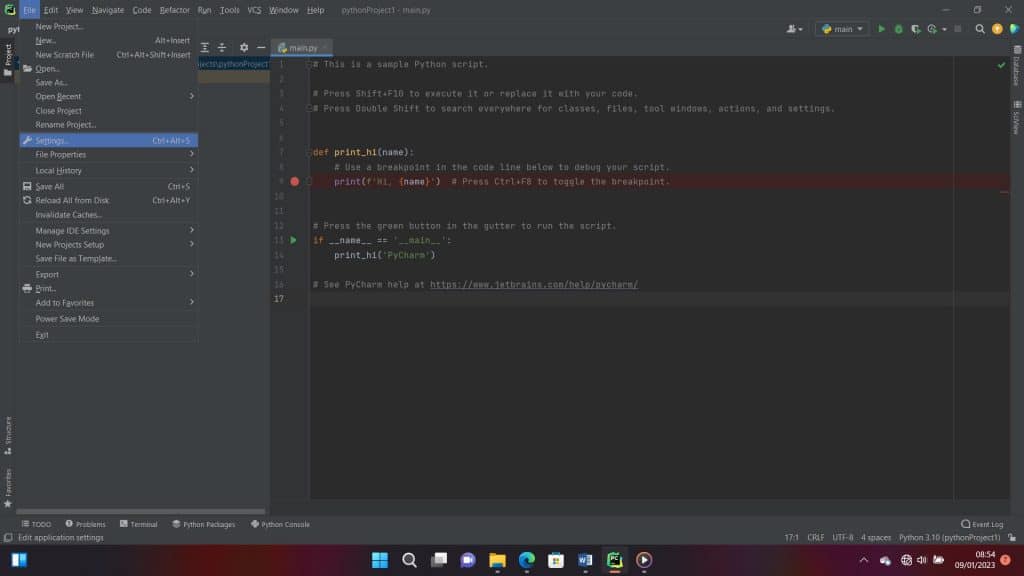
Step 1: To select it, pick File from the menu bar and then scroll down to Settings.
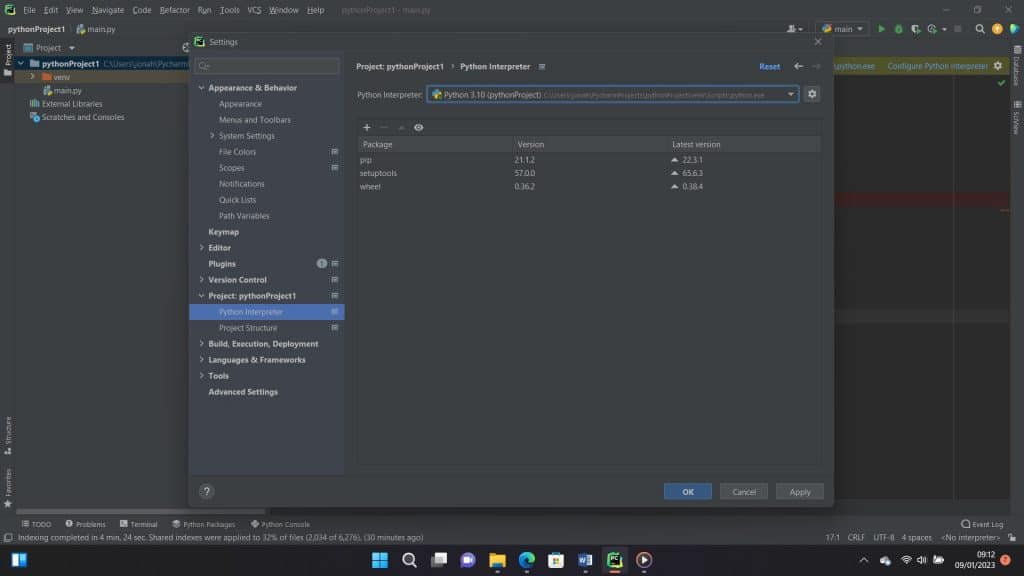
Step 2: The Settings dialog box would pop up. On the side menu, scroll down to select Project:pythonProject1. Your own project name may be different, but you will be sure to see the Project: drop-down menu. Under this, select Python Interpreter. To add a new library, click the plus (+) symbol on the top left, above the list of packages.
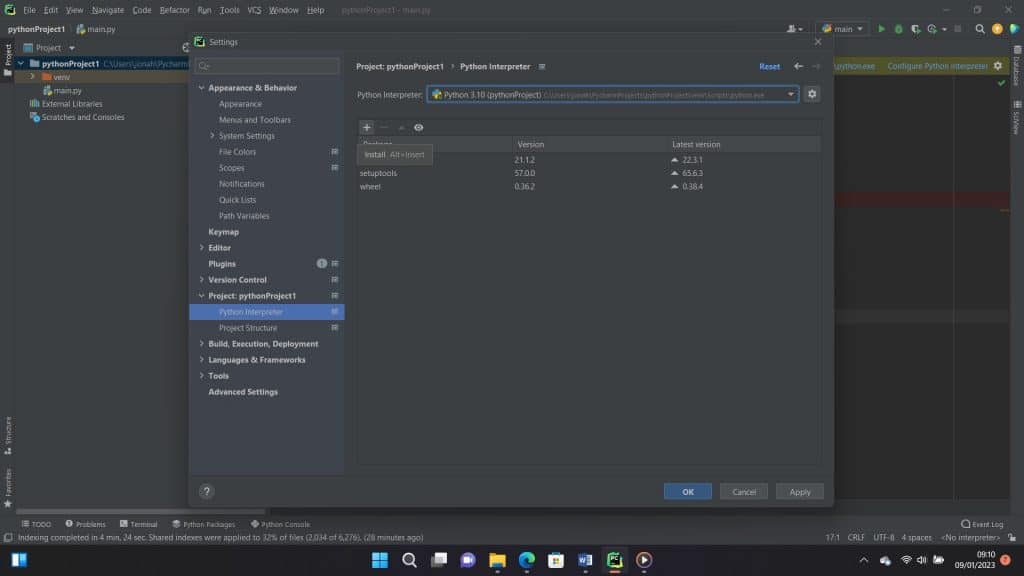
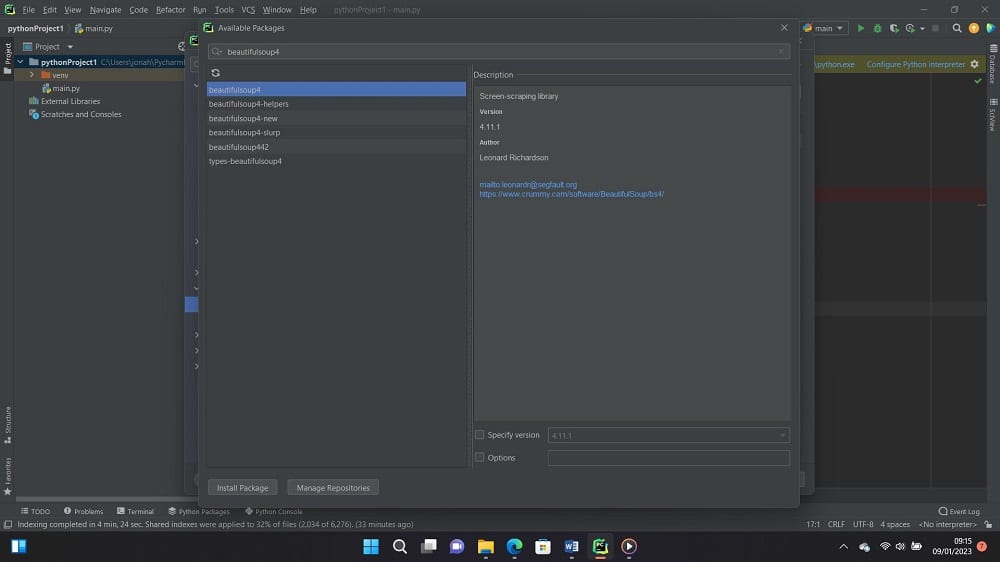
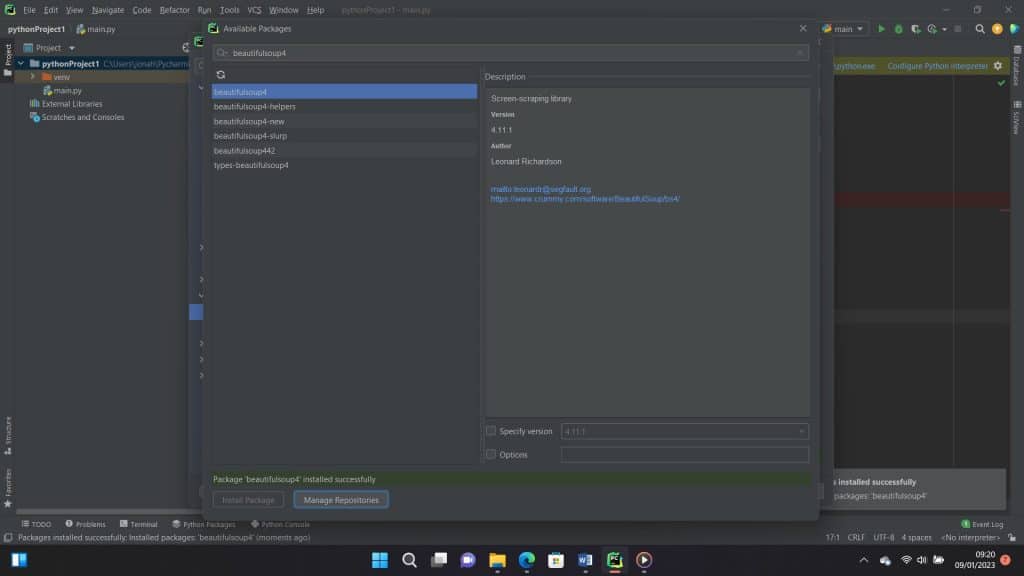
Step 3: An available packages window would pop up with a search bar. Go ahead and type beautifulsoup into the search bar. A list will appear, but make sure to choose beautifulsoup4. Click Install Package below when you are done selecting the beautiful soup.
When it is done installing, you should see this message below.
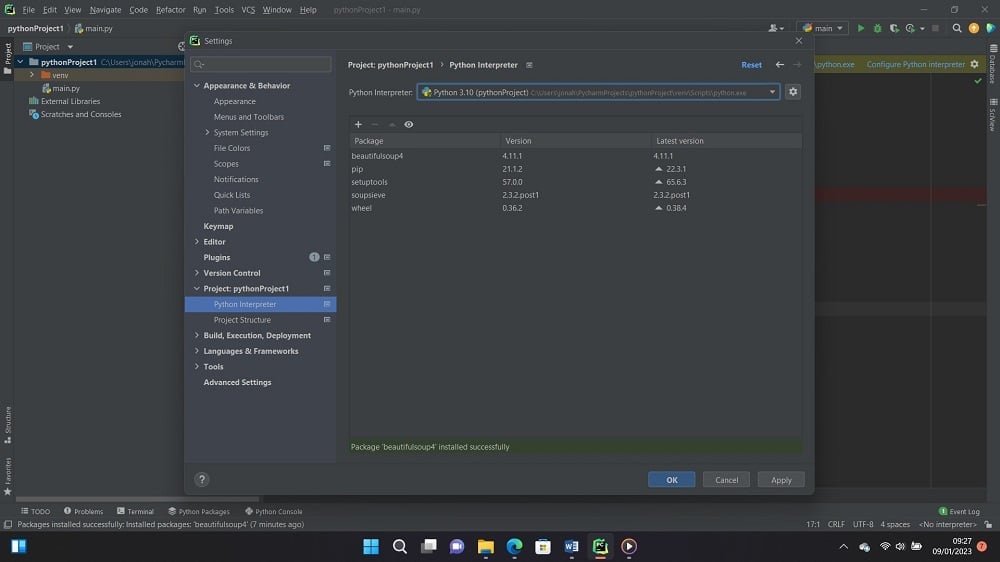
You should now see that it has been updated on your PyCharm Python packages, as shown in the image below. Click OK, and go back to the editor to import the library we just installed.
Step 4: In your editor, type the follow code.
Code:
from bs4 import BeautifulSoup
Step 5: When you right-click on the editor and scroll down to select “Run Main,” you would see this below in your PyCharm terminal.
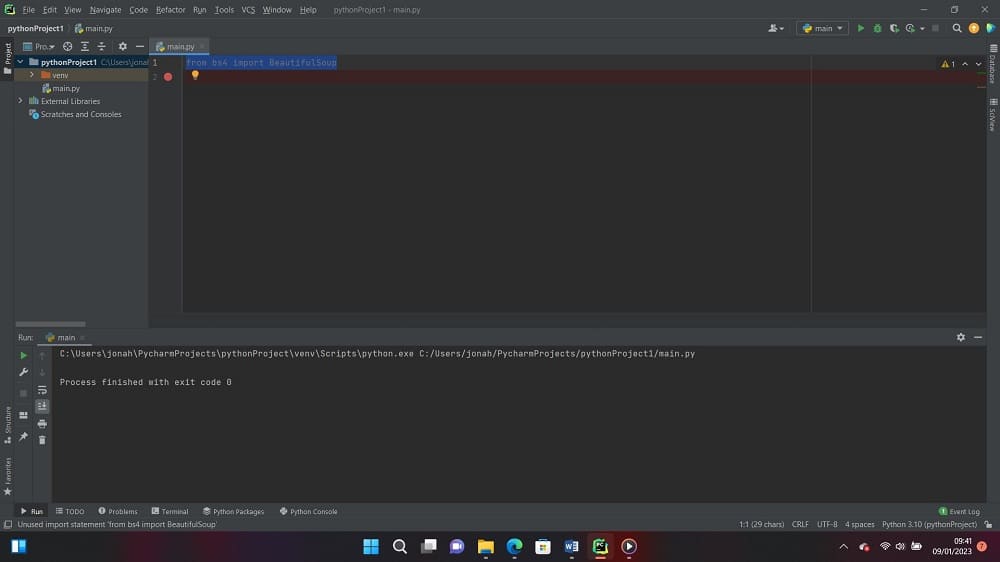
We have successfully installed Beautiful Soup. Now we would move on to the parsing of data with beautifulsoup in the PyCharm IDE.
Using BeautifulSoup to parse a page
As we mentioned earlier, beautifulsoup is a Python library known for parsing HTML data in particular. However, before we move forward, it is important to know how to inspect the web page we aim to scrape and the benefits that come with this.
1. Inspecting the Source Code of the Website

To inspect the source code of whichever website you want to scrape is the first attribute to considered while parsing a page with Beautifulsoup. What you should take note is that there are several engagements here, it doesn’t involve just a phase.
Inspecting the source code of any website is very crucial and should be clearly understood before taking on a precise scraping task, why because, a mistake can lead to wrong extraction or gathering of data.
However, before you sit to structure any python code, surf to be acquaint yourself with the website you wish to retrieve its data, know the way they design their site and everything necessary to see you through achieving you aim. After that try to open the site with your choice of browser, and carryout the following:
2. Explore the Website
Exploring in this context simply hit on taking a walk around the website. For instance, you are a digital marketer who intent to scrape an e-commerce store to get a glimpse of competitor’s current price list and operational standard or module operandi.
After opening to access the website, you click through to engage in whatever activities that are of importance just like other customers would do. Check prices of goods, scroll to read through guides and everything needed to help you find your way around the site.
Try to want to purchase something to see how the designs and structure as well as price values looks. This is important because the more you search, the more descriptive and detailed information you are likely to find.
Also, every home page, services and about us page details you click changes the URL. That should be taking note of because it will help simplify your main target, and broaden your understanding of the websites addresses and how the syntax changes.
3. Decrypt the Information in URLs
If the above homework is done correctly, you can go ahead to decode, Interpret or read the web address to acquaint yourself with how the URL is wired. Let’s not forget that this is integral if you’re a programmer trying to scrape data from your site of interest.
Remember that this applies to the entire site because if you don't know anything about it or haven't done extensive research to explore the site, your scraping driver will be defeated.
To read any URL, you have to know the structure of URLs. What this mean is that, the part of the URLs carrying the HTML file is different from that of the exact search. The specific file location is the most important because it is where the unique resource of the website is.
Take for example you punch on your browser http://www.amazon.com when the site opens and you click on the customer service, the site URL will change to this Link.

You can see that there is a clear difference compared to what you loaded initially. This tells you that the URL can be the same, but the precise parameter you are after has its own uniqueness. If you click on Today’s Deal, the URL will appear the same with a different HTML.
However, the URL is a big deal when accessing any website because its query parameters have unique syntax. Hence, the more you interact with the website, the more changes you see. The query parameter of a URL consists of three attributes: start, data, and separator.
Thus, when you can analyze the URL of your target site correctly, your task becomes even easier. Let's analyze the query parameter of the above customer service URL using the three query attributes:
-
Start
The start tells you the point where the specific HTML details begin. The question mark syntax (?) is used to represent it. Take note of this.
-
Data
Data describes the information contained in a specific URL query parameter, which is encoded by the assignment operator, i.e., the equal sign (=). This syntax often joins keys and values that connect together.
-
Separator
This is the ampersand sign between the key value and the ref. The interesting feature of a URL is its ability to change upon every command, so make sure you understand this syntax. It will help you scrape correctly.
Use Developer Tools to Inspect the Site
Another parameter to consider when inspecting any website, you intend to scrape is developer tools.
Just as stated above, knowing the structure of the website you intend to scrape is a top priority as that is a determinant. to the document you need. This context is where the developer tool comes into play. The developer's tool will help you understand the structure of the site you want to scrape. Interestingly, every advanced browser has this tool installed, although it differs in system type. It is not as accessible on Windows and Linux as it is on macOS.
To open the developer tool in Chrome, open the Chrome menu in the upper right-hand corner of the browser and select More Tools > Developer Tools. Also, on macOS, you can use Option + ⌘ + J to access its shortcut, while on Windows and Linus, you can use Shift + CTRL + J to gain quick access.
Finding elements by ID
Having inspected the page, finding elements by ID is quite easy and straightforward. Just make sure your beautiful soup library is installed and up to date.
Step 1: The first thing we are going to do is import the Beautiful Soup library.
Code:
from bs4 import BeautifulSoup
Step 2: The following step is to add requests to the library. This is a good time to get the source code for our target page. In this case, the URL is https://amazon.com. To do this, input the following code:
Code:
import requests

r = requests.get ("https://www.amazon.com/s?k=gaming+mouse")
Step 3: You should convert the HTML code into a BeautifulSoup object, commonly known as soup.
Code:
soup = BeautifulSoup(r.content,"html.parser")
Step 4: Make sure to cross-check the specific ID you intend to parse. This is important because the IDs of elements are unique. Therefore, we would be using the find method. You can use soup.find all(id=”value”) but since its ID is unique, you can just use soup.find all(id=”value”). Besides, locating it shouldn’t be that difficult. The following code below shows how to get it done.
Code:
element_by_id = soup.find("div", {"id":"a-page"})
You would notice that in the above code, we first declared the tag before declaring the ID.
The entire line of code should look like this.
Code:
from bs4 import BeautifulSoup

import requests

r= requests.get ("https://www.amazon.com/s?k=gaming+mouse")

soup = BeautifulSoup(r.content,"html.parser")

element_by_id = soup.find("div", {"id":"a-page"})
Finding elements by Class Name
Similarly, you can still select HTML elements by class name. This time you have to use the find_by_class method. The code should look like the one below.
Code:
from bs4 import BeautifulSoup

import requests

r=requests.get ("https://www.amazon.com/s?k=gaming+mouse")

soup=BeautifulSoup(r.content,"html.parser")

element_by_class=soup.find("div", class_="a-size-medium")
Extracting text form HTML element
Let’s say you are interested in scraping paragraphs from web pages. Using the requests and bs4 method we discussed earlier, Python's BeautifulSoup library can assist you in obtaining that.
code:
import module

import requests

from bs4 import BeautifulSoup

# link for extract html data

def getdata(url):

   r = requests.get(url)

   return r.text

htmldata = getdata("# import module

import requests

from bs4 import BeautifulSoup

# link for extract html data

def getdata(url):

   r = requests.get(url)

   return r.text

htmldata = getdata("https://blog.casaomnia.it/en/indispensable-kitchen-utensils/")

soup = BeautifulSoup(htmldata, 'html.parser')

data = ''

for data in soup.find_all("p"):

   print(data.get_text())

")

soup = BeautifulSoup(htmldata, 'html.parser')

data = ''

for data in soup.find_all("p"):

   print(data.get_text())
The approach in the code above is to import a module and then create an HTML document. In this, we can specify the <p> tag into the code.
Next is to pass the HTML document into the beautifulsoup() function, and then use the P tag to extract paragraphs from the beautifulsoup object. Meanwhile, get_text() helps get text from the HTML document.
Exporting data to a CSV file
Now that we have gone through how to pass HTML and XML data, it's time to see how to save the data you scrape for later use.
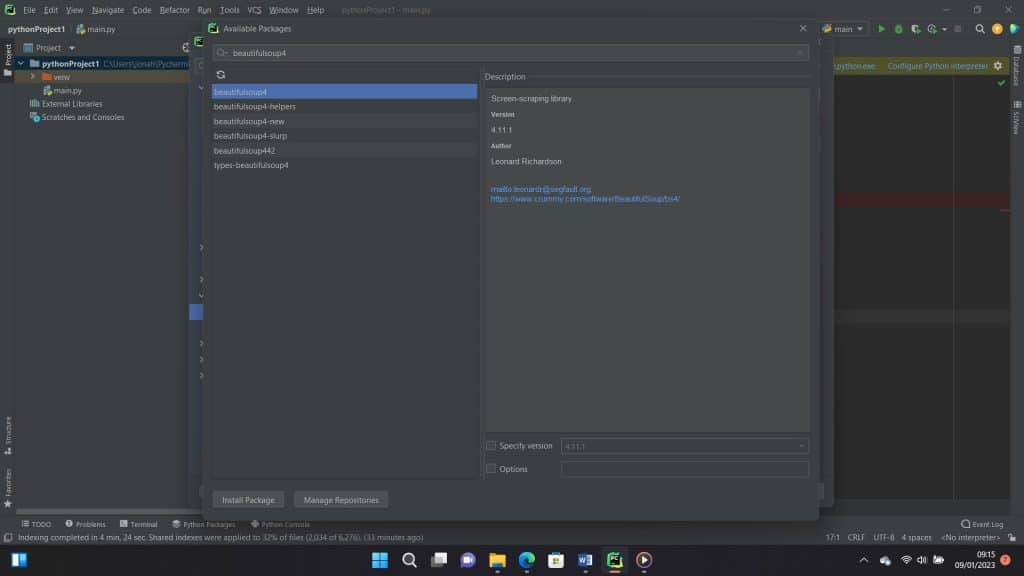
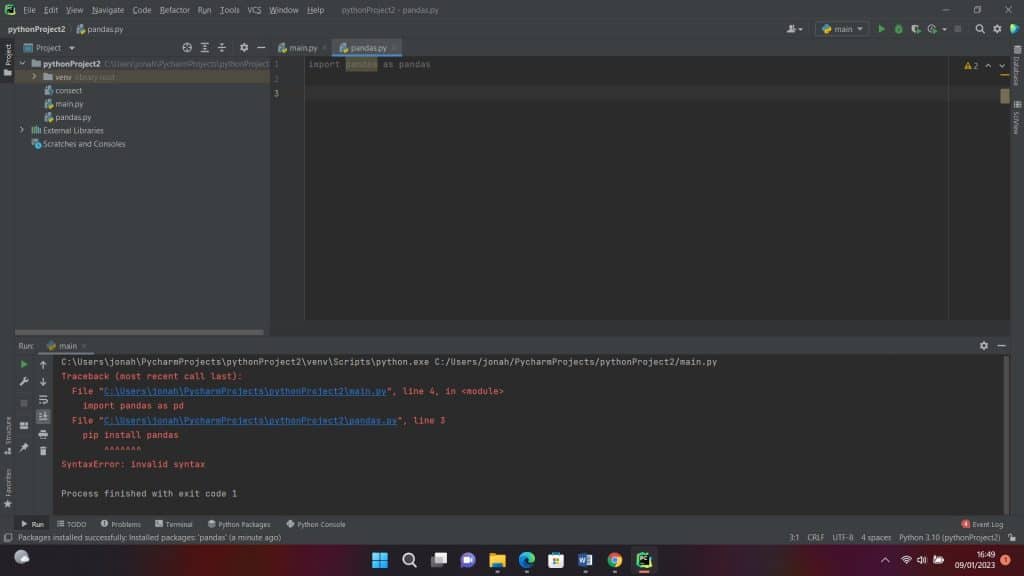
First, we need to install the Pandas library. This library helps Python store and generate structured data. To install the library, you can either follow the steps we followed for the BeautifulSoup library or add the following lines of code.
Code:
pip install pandas
or
#Add this to your code.
import pandas as pd
After installing Pandas, input the code below to export your data to CSV.
Code:
import pandas as pd

from bs4 import BeautifulSoup

path = 'https://www.iban.com/dialing-codes.html'

data = []

# To get the header from the HTML file

list_header = []

soup = BeautifulSoup(open(path), 'html.parser')

header = soup.find_all("table")[0].find("tr")

for items in header:

   try:

       list_header.append(items.get_text())

   except:

       continue

# Fetching the data

HTML_data = soup.find_all("table")[0].find_all("tr")[1:]

for element in HTML_data:

   sub_data = []

   for sub_element in element:

       try:

           sub_data.append(sub_element.get_text())

       except:

           continue

   data.append(sub_data)

# Storing the data into Pandas DataFrame

dataFrame = pd.DataFrame(data=data, columns=list_header)

# Converting Pandas DataFrame into CSV file

dataFrame.to_csv('Tables.csv')
Having successfully imported the Pandas library with either of both methods, beautiful would help fetch the document header form the HTML file after which it would go ahead to fetch the table data proper. However, to store this data, Pandas library is needed. Here we introduce the library’s DataFrame to store the data in CSV format.
FAQs About Beautifulsoup Guide
Q. Is BeautifulSoup a Python module?
Yes, BeautifulSoup is a Python module. It is used to parse and scrape data from HTML and XML files. As a programmer whose major involvement deals in internet data scraping or extraction, you can imagine how exhausting and time-consuming it will be without the right scraping tool set to use in carrying out the activity.
As such, when you use a tool like Beautifulsoup, which is specifically designed for scraping complex and diverse HTML websites, the time spent will be less and your goal will be more productively achievable.
Q. Do I need to Install Beautifulsoup?
Beautifulsoup is not in the standard library, and thus, it needs to be installed before you can use it to extract any data. Beautifulsoup supports an HTML parser in the Python standard library. In addition, it also has support for many other external Python parsers, like the LXML parser, among other Python parsers. More so, in this tutorial, you learned hands-on how you can install this Python scraping tool.
Conclusion
Parsing important data from web page documents can be difficult because of the messy nature of how HTML pages are written by designers. As a Python web scraper developer, you do not need to worry too much about the complexities as Beautifulsoup can help you take care of the difficulties involved.
The guide above shows you how to use the Beautifulsoup library in short. you should read the Beautifulsoup official documentation to learn how to make use of it in detail and for more complex usage.


