Are you new to the Apify platform and you want to learn how to make use of it for your web scraping and automating your tasks? Then be my guest in the article below. I will be showing a step-by-step guide on how to make use of the platform properly.
Web scraping has revolutionized how we collect data and the amount of data we are able to collect, clean, and interpret from the web. While the process has become popular today, there are actors that are even ready to make it even more popular and accessible for many people. And this time, not even only to coders, but to non-coders as well.
In the past, web scraping requires you to know how to code or pay a coder to develop a web scraper for you. This has changed now as there are web scrapers that have been developed for those without coding skills. One of the tools available to non-coders is the Apify service.
The Apify service is behind the Apify platform a platform developed to help both coders and non-coders extract data from the web automatedly and even does have support for automating other repetitive tasks online. If you have heard of this platform and you are on this page, there is a high chance you do not know how to make use of the tool.
In this article, we would be showing you how to make use of the Apify service and range of tools to effectively scrape data from the web in easy and stress-free steps. Before doing that, let’s take a look at an overview of the Apify platform.
Overview of Apify
The Apify platform is a web automation platform available as a web service. According to the information on its homepage, the service can help you automate anything tasks you can manually do on browsers. Truth be told, they are not there yet considering the use of the word, “anything”.
However, I can attest to the fact that they can help you automate your web actions. Interestingly, they are more commonly used as a web scraping platform. This is because the service has got a good number of specialized web scrapers developed specifically for scraping data from specific websites.
Aside from its own web scraper and automators which are made available for you to use, there are third-party web scrapers developed by independent programmers.
You can also develop a custom tool that you can make available for others to use and get paid for it. However, this is only possible if you know how to code. Without coding skills, do not worry, you can still scrape any data you want provided Apify has an actor for it as the platform was specifically developed for those with no coding skills.
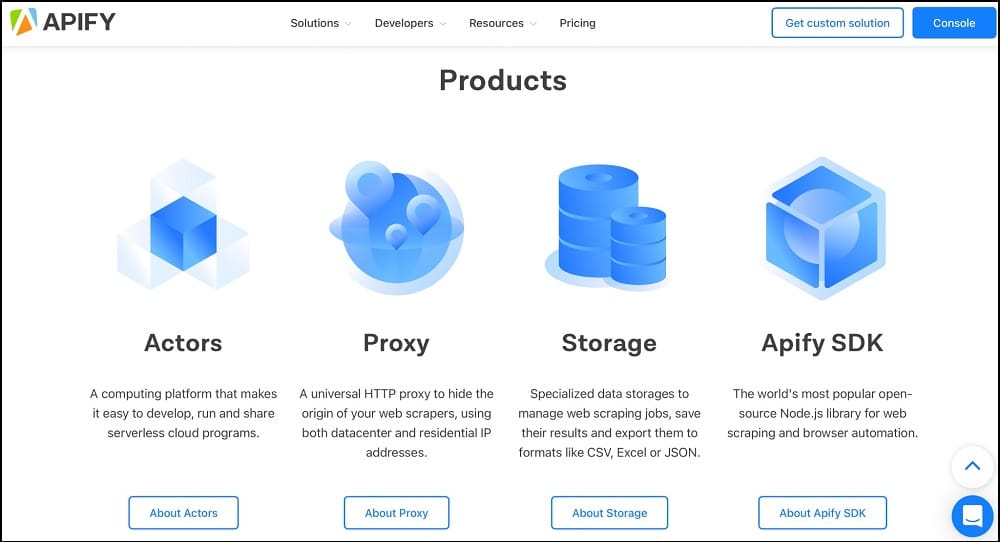
Apify has got a good number of big names that trust and use their service worldwide. Aside from the web scrapers, it provides which are known as actors, the service also provides other tools including proxies, specialized data storage service, and an SDK for developers. Apify is a paid service but it has got a free plan that you can use for some of your tasks.
Apify Interface – Description of Apify Interface

Except you are a developer looking to integrate the service into your custom tool, you wouldn’t need to download any tool in other to make use of Apify. All you need is a web browser to make use of the service and download scrape data. The service has got a user dashboard through which you can access the platform.
I will advise you to register an account and follow me up as I describe the interface and move into the step-by-step guide on how to make use of the platform. From the above, we made mention of Apify being a paid platform right? Well, it is not completely paid as it has got a free plan which you can use to carry out some form of web scraping.
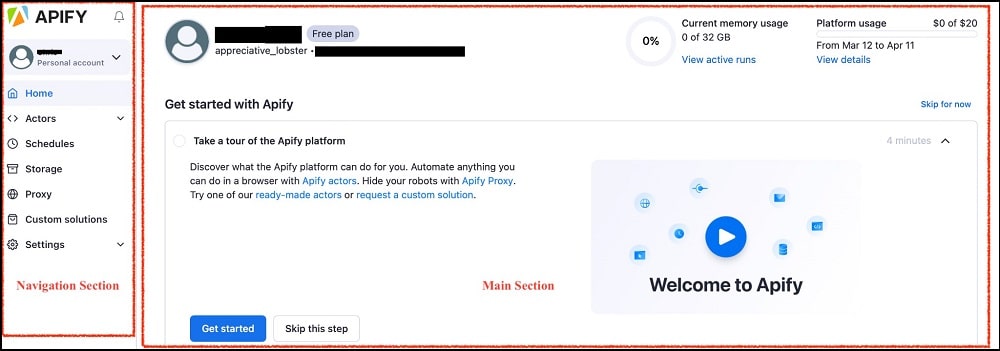
It even offers you free shared proxies which can be useful against some popular sites. If you log into the user dashboard, you will be greeted with the below screen.
From the above, you can see that there is a navigation section and the main section. The main section is the area where all of the tasks are done. The navigation section does not change and is there for you to quickly reach any of the tools regardless of the page you are on.
Actors: The Actor tab is the most important as it is from here that you run the web scraping tasks or other tasks you are interested in. You can find the actor stores where you can choose from a list of supported actors or web scrapers. There is also a tab that will lead you to a page where you can create your own actor if you have coding skills.
Schedules: For the Schedules tab, its main use is for scheduling tasks. It might interest you to know that Apify has got support for task scheduling which makes it possible for you to schedule your scraping task to run at specific periods without you being logged in. This is good for collecting data you will need at time intervals.
Storage: Apify has got support for specialized data storage to manage web scraping jobs, save their results, and export them to formats like CSV, Excel, or JSON.
Apify Proxy: This tab will lead you to the proxy service of Apify and how you can activate and set it to work with your actors. Web scraping in most cases, will require you to make use of proxies either to evade IP tracking and blocking or to access geolocation content. Apify has got both residential and datacenter proxies to meet your need.
Custom Solutions: Sometimes, the data you want to collect is not supported by any of the web scrapers or actors available in the store. If you are not a coder that can develop an actor that can get that done, you can use this tab to reach the page where you can request for the actor to be built for you.
Settings: The settings area is self-explanatory. With it, you can edit your profile, update billing information, and get your personal API token for integrating Apify with your tool or other tools on the Internet.
How to use Apify Scrapers for Web Scraping [A Step by Step Guide]
Even though the Apify service will want you to take it as a web automation platform, if you look at it, you can tell that web scraper is the core of the platform and makes up the larger chunk of the actors in the store for this service.
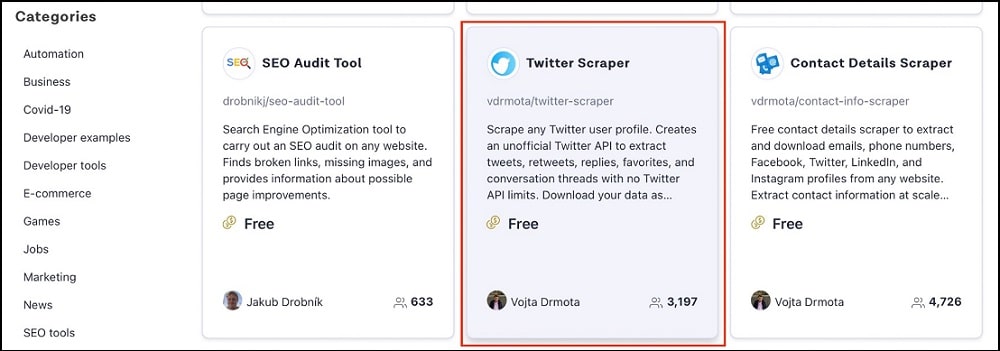
The service has got support for a good number of specialized actors such as Amazon Scraper, Google SERP Scraper, Google Map Scraper, Instagram Scraper, Facebook Scraper, Twitter Scraper, YouTube Scraper, Contact Details Scraper, and many more. You can visit the Apify Actor store to see the full list of scrapers supported by the platform.
The service even has support for a generic web scraper you can use to scrape all kinds of data provided the data is publicly available on the Internet for all to see. In this tutorial, we would be using the Twitter Scraper to collect tweets and replies, retweets, and other details from a user without any API limit. The steps are highlighted below.
Step 1: Log in to the user dashboard (https://console.apify.com/) using your username and password.
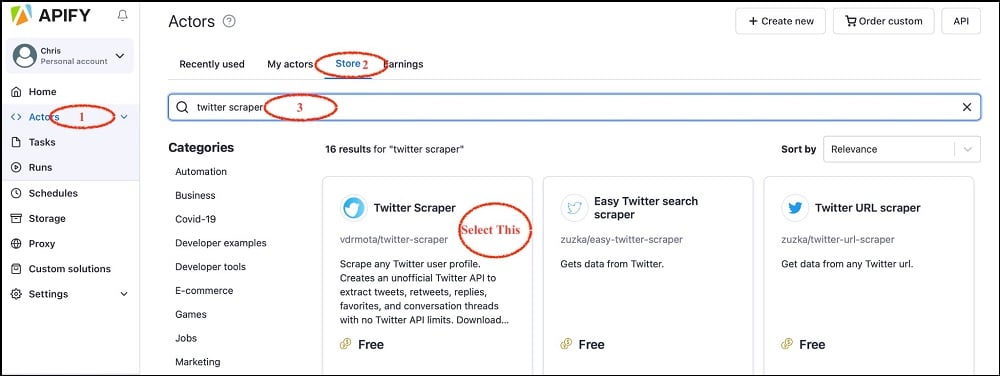
Step 2: Click on the Actors tab and then on the Store tab to be taken to the list of Actors available for you to use. Enter “Twitter Scraper” in the search input field provided and select Twitter Scraper from the options provided.
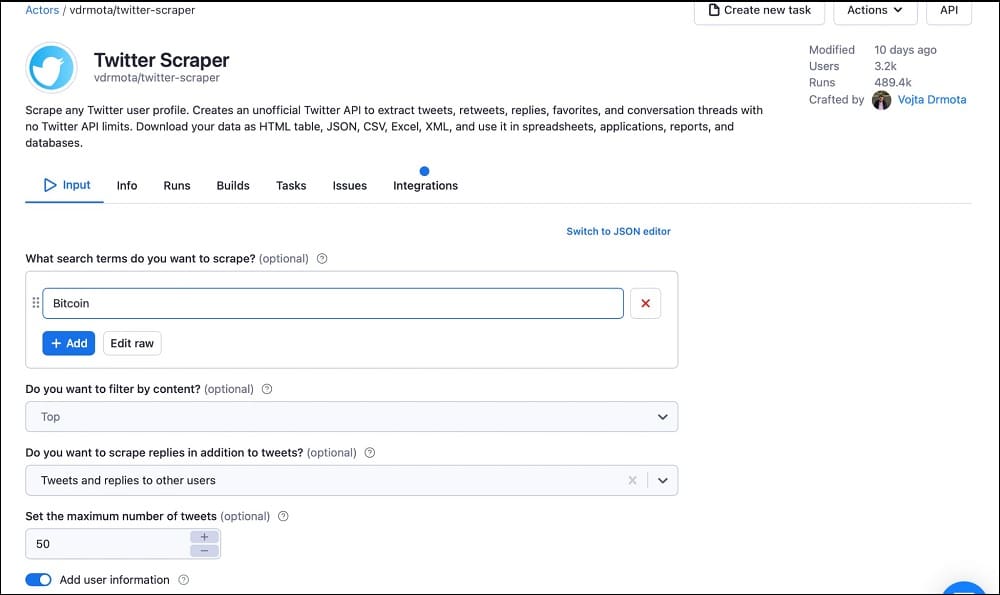
Step 3: If you select the Twitter Scraper and click it, it will open the interface where you can define parameters and set up the web scraper to get to work. Below is the Interface you should see.
Step 4: The Input tab is the focus usually. The setting required is self-explanatory for this. The first field requires you to enter a search term that will be used for searching for tweets. It is important for specifying keywords and hashtags.
The other setups are also self-explanatory. Usually, the tool comes with a default configuration that you will only need to change if you have a unique requirement. If you scroll down, you would see the below.
Step 5: All of the other configurations mentioned in the screenshot above are optional except for the Proxy Configuration. You should click on them and tweak the settings understand how to make use of it. The idea is to show you how to use an actor and as such, we might not be too specific with all of the explanations here.
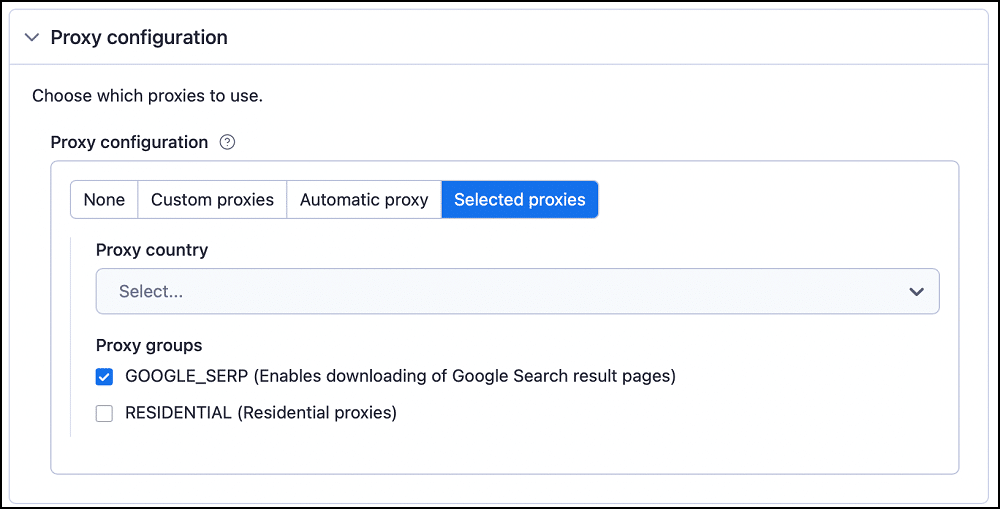
Step 6: Go to the Proxy Configuration tab. You can either make use of your own proxies or the proxies on Apify. I use the proxies provided by Apify for free.
Step 7: Once you are done with all of the configurations required, you can then click on the “Start” button and the web scraper will start collecting the data for you.
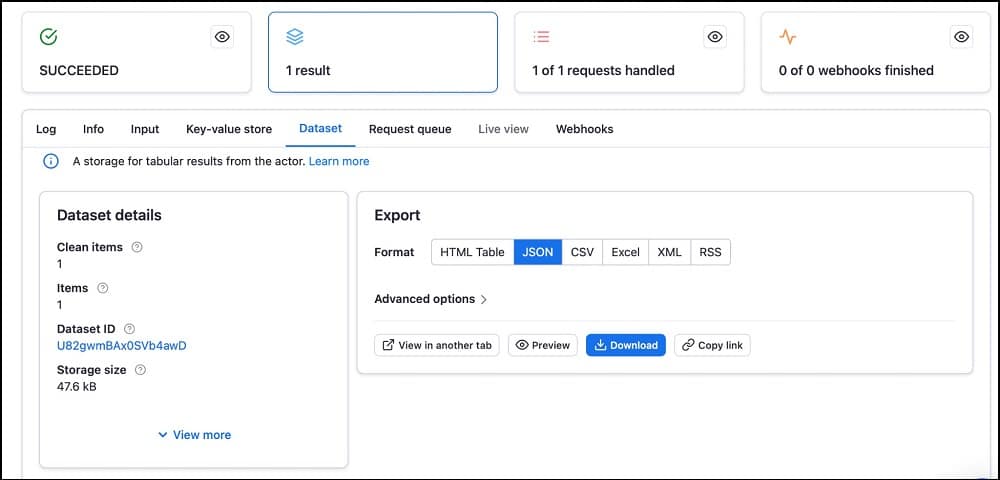
Step 8: If the scraping job is successful, you will see the interface below.
The interface is self-explanatory. In the “Export” section of the page, you will see the supported formats which include HTML table, JSON, CSV, Excel, XML, and RSS. Choose the format you want and click on the download button. You can also click on the preview to see the data before downloading it.
How to Setup Proxies for Apify
As with most web scrapers, the Apify service has got support for proxy usage which is needed for evading IP-based blocks and accessing geo-targeted and restricted content on the Internet. For Apify, you have 3 options when it comes to using proxies.
You can either make use of proxies from any provider of your choice, buy proxies from the Apify proxy service, or use the free shared ones provided by the platform. In this section of the article, we will focus on how to integrate proxies from third-party providers.
Step 1: Go to any provider of your choice and buy the proxies you need. Some of the best choice for web scraping includes Bright Data, Smartproxy, and Soax.
Step 2: From the provider, you bought proxies, get the proxy address, port, username, and password. The step to getting this information varies from provider to provider, you should contact your provider for more information.
Step 3: Head over to the user dashboard, and choose the actor you want to make use of. The procedure for configuring proxies differs from actor to actor but the fundamentals remain the same.
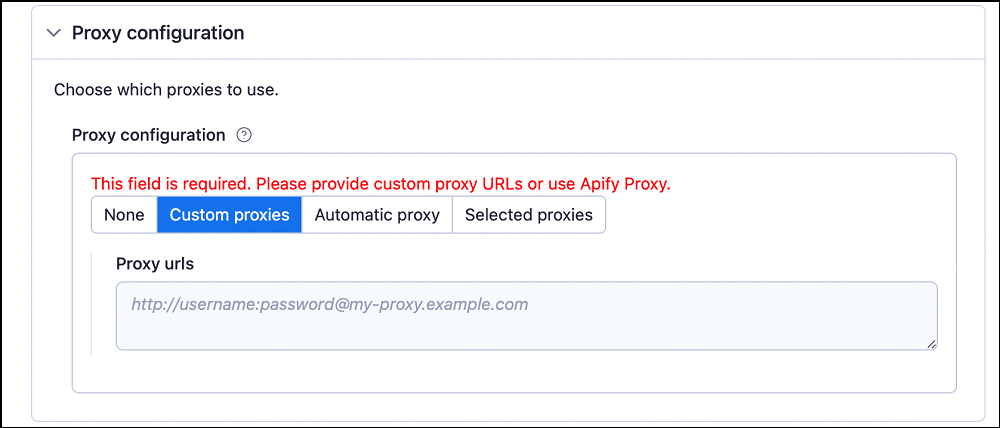
Usually, the proxy settings are found somewhere under the input tab. For some, it will be under the heading “proxy and browser configuration”. For some actors, the settings is found under “proxy configuration. Usually, it will look like the below if you click on it.
Step 4: Go to the “Custom proxies” tab and enter the proxy details in the URL format provided. Let’s say the proxy address is endpoint1.proxynode.com, the port is 8080, and the username is user1, while the password is pass1, the format will be https://user1:[email protected]:8080.
Step 5: After you are done, continue with the other settings and run the scraper. If you want, you can use the Automatic tab instead of the “Custom proxies” tab to get proxies from the Apify service. However, you only be able to do this if you have a proxy subscription with them. For their free proxies, use the “Selected proxies” options.
Step 6: The first option in the proxy settings up there is self-explanatory — if you choose it, your request will not be routed through any proxy service. While the option can work for some tasks, most would reject and you won’t be able to scrape. If you do not have a proxy subscription and can’t afford one, using the “Selected proxies” option is the best for you, and choose one of the available pools.
How to Schedule Web Scraping Tasks Using Apify
One of the features that are available in the Apify platform is the ability to schedule scraping. If you have the task of collecting data from a website either daily or weekly, then the best thing to do is have it scheduled so that you do not have to do it manually every single day or week you have to.
In this section of the article, we would be showing you how to schedule scraping tasks using the Apify platform.
Step 1: Go to the user dashboard and log into your account. This guide assumes you already know how to scrape data using Apify and have already used an Apify actor. Without doing that, you won’t see any actor to schedule tasks for. If you haven’t, follow the procedures highlighted above to learn how to scrape data using Apify actors and use one so that you will have an actor to use in this guide.
Step 2: Click on the Schedules tab from the navigation section of the user dashboard. It will open up a page. The list of schedules should be empty because you haven’t scheduled an actor to run just yet.
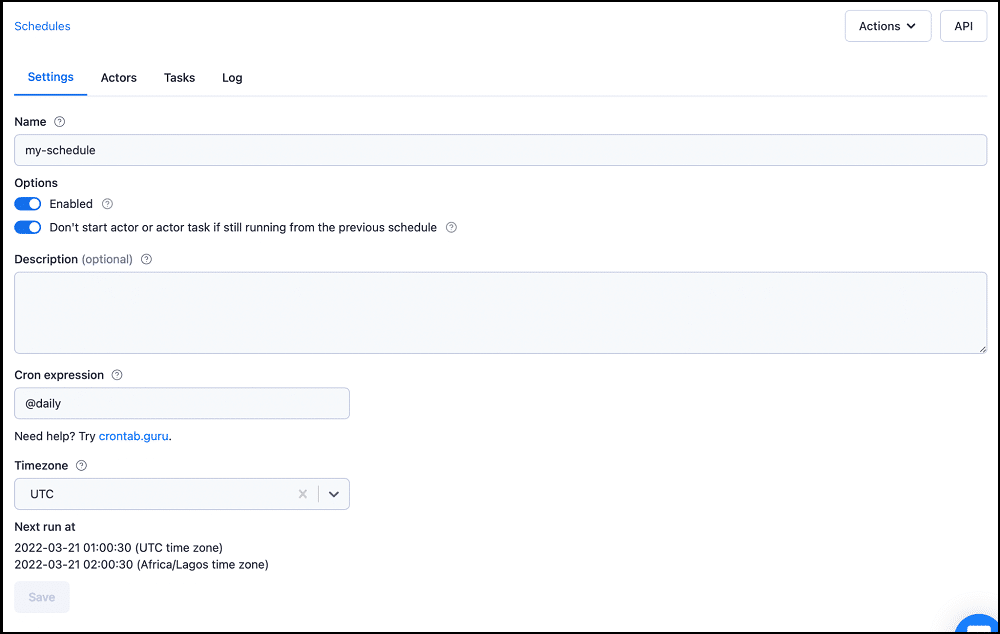
Step 3: Click on the “+ Create new” button to create a new schedule. The page for you to set up the schedule will open. There are 4 tabs for this — Settings, Actors, Tasks, and Log.
Step 4: Give the schedule a name, choose whether you want the scraping to be daily or weekly from the Cron expression option, and choose the timezone most appropriate to you.
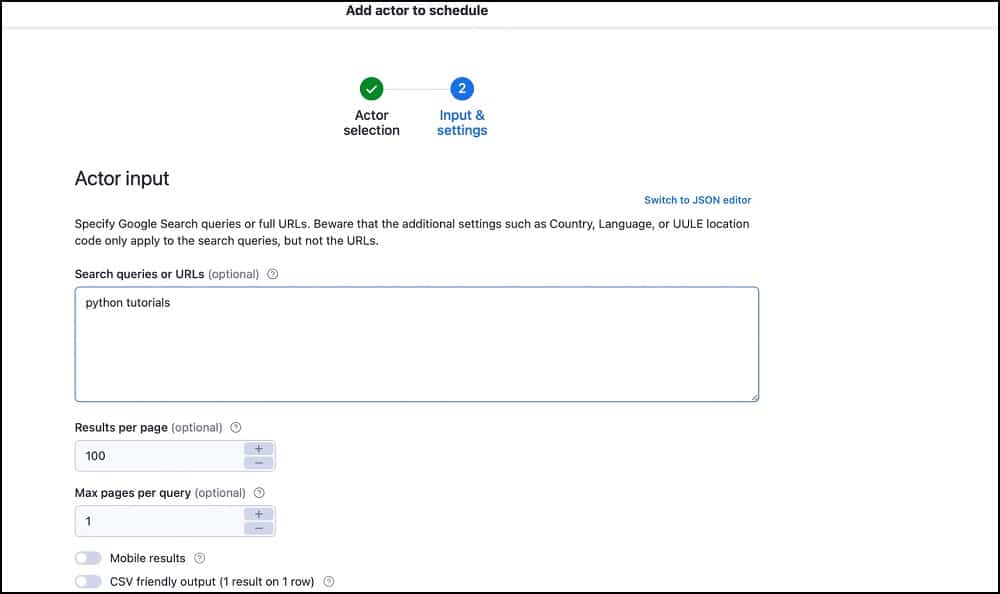
Step 5: Go to the Actor tab and click on the “+ add actor” to add an actor to the schedule. You will see a list of the actors you have used in the past.
Step 6: Set the actor up as you would set it if you want to carry out a regular scraping and then click on the “Save” button. The actor will be added to the list of actors. You can add more than one actor for the same schedule and the would run at the same time.
Step 7: Go back to the setting tab and then scroll down and click on the Save button. Your actor should run at the scheduled periods.
FAQs About Apify Scraper
Q. Is Web Scraping Free on Apify?
The Apify platform can be both free or paid depending on the tools you use. Generally, the pricing for the platform can be confusing especially if you have not made use of the platform before. This is because at the core of the platform is a paid system where you pay for running an actor on it.
Some of the actors are free while others especially those developed by this-party developers are paid. You also get to pay for high-quality proxies if you need them. However, even though it seems to be paid, you can register as a free user and you will be given a $5 monthly credit free to use. With this, you can use the free actors and their shared proxies for free.
Q. Does Apify have an API for Developers?
Apify is a full package, providing support for programmers and non-coders. If you are a developer, it might interest you to know that you are at the core of the platform as you do not need to make use of the actors from the web interface as non-coders would. You can access the actors and use them directly in your code as a developer.
All you need is to have the Apify package in your code. The service provides easy-to-understand documentation for the API which makes it easy for developers to understand and began building quickly. Read the official Apify Developer API Documentation to learn more about the API.
Q. Can Apify Scrape Modern Websites?
Apify is a modern-day tool and has got support for scraping most of the popular websites on the Internet including the ones that championed the heavy use of Javascript and appear to be more like apps instead of regular static websites.
Most of the actors (web scrapers) were built with Puppeteer and Cheerio which are the modern tools for scraping modern websites as Puppeteer automates Chrome and can render Javascript. You can use the Apify platform to scrape data from all kinds of websites. If an actor is not available for the data you want, you can either use the generic web scraper provider or request the development of an actor for that.
Q. Is Proxy Usage a Must for Scraping on Apify?
When it comes to web scraping, proxy usage is usually a consideration. The only situation you will not need proxies is when you are going to be scraping only a few pages. However, if the Apify actor will be extracting data across multiple pages, then using proxies is a must.
This is because sending too many requests will reveal to your target website that a bot is being used and the IP address being used by the actor will be blocked. You will need rotating proxies to be able to scrape efficiently.
Sometimes, you can be interested in scraping geo-targeted data from regions other than the region you are in, and in such a case, you will need to use proxies from such region in other to access the data of interest.
Conclusion
Apify indeed, has proven to be one of the top web scraping solutions in the market, providing support for both developers and non-developers to extract data at any scale they so wish. If you have not used the platform before, you might think that it is completed.
However, if you read the guide above, you will agree with me that Apify is one of the easiest web scraping solution providers out there. Interestingly, it does have a free tier that can be appropriate for small users.

