The proxy configuration setup in Wi-Fi is confusing to you? Come in now and find out what it means and how to configure it to enjoy maximum privacy while using Wi-Fi to access the Internet.

In the Wi-Fi connection setting, there is a section that is labeled proxy which is optional and most users leave blank. In most cases, this is left blank because many do not know what it is, its usage, and how to set it up. Unfortunately, not setting this, especially for Wi-Fis you don’t have control over puts you at a privacy risk and allows it to enforce its rules of blocking sites you can’t access.
In this guide, I want to discuss what proxy in the Wi-Fi connection setting means and how to configure it to have unrestricted access to the website of your choice.
What is Wi-Fi in Proxy?

The term proxy is the short form of proxy server. A proxy server is as the name implies, a server or computer, hosted elsewhere, that acts as an intermediary between you and websites on the Internet. When you use a proxy, your web requests are not directed to the intended websites. It is first passed through the proxy which then sends them to the intended website on your behave.
When the response is to be returned, it is returned to the proxy server as it is seen as the originator of the request which then forwards it back to you. So basically, proxies sit between your device and websites, forward requests from you to websites, and forward the responses from the websites back to you.
There is something interesting about this interaction that is a game changer — your device is not recognized in this interaction and as such, the IP address registered is that of the proxy. This generally allows you to access the Internet using a remote computer, not yours.
What are the Benefits of Using Proxies in Wi-Fi Connections
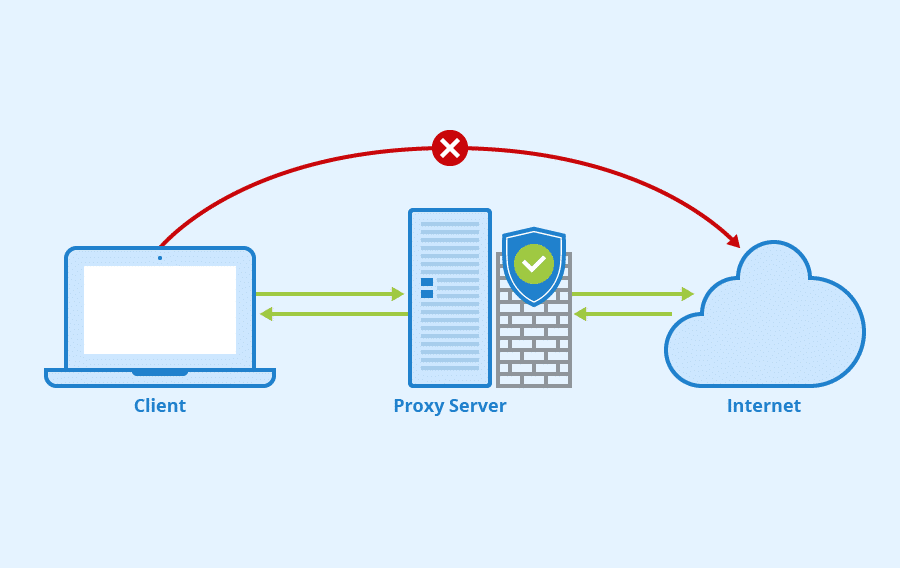
I already mentioned using a proxy server means accessing the Internet via a remote computer, masking your own real computer or device. But what are the benefits you stand to benefits from this setup? Let's take a look at some of them.
-
Unblocking Websites
Some Wi-Fis, especially those at schools or workplaces have some websites blocked to increase productivity. Take, for instance, school Wi-Fi admins maintain a list of blocked sites with gaming and porn sites included. If you try accessing a blocked site using their Wi-Fi, access will be denied. However, if you use a proxy, the request will not actually be directed at the intended site but at the proxy server.
It is the proxy server that will decode it and send it to the target site. By doing this, you are able to bypass this restriction and gain access. Also, if the IP address of a Wi-Fi is blocked from accessing a site. You can use a proxy which gives you an alternative IP address in other to grant you access to the website.
-
Access Geo-Targeted Content
Some websites show content to different users based on their location while some will outrightly block you because you are accessing from an unsupported location. Take, for instance, you can’t access Netflix US from Nigeria. When you use Wi-Fi, you use its IP address. By using a proxy located in the US, you are able to access Netflix US even though the Wi-Fi IP address is a Nigerian IP address.
-
Privacy from Wi-Fi Operators
Just in case you are not aware, your activity online is visible in plain text to the Wi-Fi administrator you are connected to. This poses some serious privacy and security concerns as malicious administrators can leak your activities to colleagues and authorities or use the details for other malicious intent.
They can also use that to steal login details. By using a proxy, they are unable to monitor your activities and make sense of them, thereby keeping you protected against the privacy risk associated with using public Wi-Fi.
Requirement for Proxy Usage
Proxies, unlike VPNs, do not require the installation of any application. What you need in other to use proxies includes the proxy host (address), port, and an optional username and password for authentication. All of these are provided by the proxy provider.
The proxy host is in the form of an IP address such as 192.65.34.93 or domain name us.fastpserver.com. the port is in the form of a number. The proxy address and port are the two universal requirements.
However, for paid proxies which are what we recommend, you need an authentication method. If you authenticate via username and password, then that forms part of the proxy details you collect from a provider. If you go with the IP whitelisting, all you have to do is whitelist your IP address from the provider's website.
Best Proxies for Wi-Fi Connection Configuration
For Wi-Fi connection, I recommend you use static residential proxies otherwise known as ISP proxies. There are other types of proxies too including datacenter, rotating residential, and mobile proxies. However, static residential proxies are exactly like the same IP address you use, making them indistinguishable from sites that block proxies. They are equally fast and affordable to the average Internet user.

Proxy-Seller is the recommended provider of static residential proxy. It does offer IPs from over 25 countries including the United States, the UK, and more countries in Europe and Asia. The cost per IP is $3 but you can get it cheaper if you purchase more IP addresses.
How to Configure Proxy in Wi-Fi
The specific step required to set proxies for Wi-Fi connections is different depending on the platform and Operating System (OS). I will describe how to get it done on macOS, Windows, Android, and iOS.
Proxy in Wi-Fi Configuration for macOS
The proxy setting is done individually for each Wi-Fi network in macOS. Below is the step-by-step guide on how to set a proxy for Wi-Fi on macOS.
Step 1: From the available list of Wi-Fi discovered, click and connect to the one you want to use. If password is required, provide it and connect.
Step 2: Go to System Preference on your macOS computer and click on Network.
Step 3: You should see the name of the Wi-Fi you are connected to. If you can’t see it, it is either the connection failed or you are not in the Wi-Fi tab.

Step 4: Click on the ‘Advanced’ button and navigate to the ‘Proxies’ tab
Step 5: Select the protocol — this will be provided by the proxy provider. It is usually HTTP or HTTPS. Some offer SOCKS5 too. In macOS, HTTP is the web proxy, HTTPS is the secure web proxy, and SOCKS proxy is SOCKS5.
Step 6: Enter the proxy server address and port in the space provided. You can also provide the username and password there. However, I do not do this in most cases as the browser will always request you to provide it with the username and password the first time you try using it.
With the above method, you have successfully set up proxies. Make sure you visit the IPinfo.io website and check your IP address before and after configuring the proxies. If the IP address changed to the IP of the proxy, then the setup was successful.
Proxy in Wi-Fi Configuration for Windows
Below is the step-by-step guide for setting proxies for Wi-Fi on Windows. Unlike in the case of macOS, you don’t set proxy individually for Wi-Fi networks. The same setting will be used for both Ethernet and Wi-Fi.
Step 1: Click on the ‘Start’ icon and head to ‘Settings’.
Step 2: Navigate to “Network and Internet” and then “Proxy Server”.

Step 3: Scroll down until you find the ‘Manual Proxy Setup’ and activate the “Use a Proxy Server” option. You will see the forms to enter the proxy address and the port will open.
Step 4: Click on the ‘Save’ button
Head over to ipinfo.io on your browser and check the IP address detail. If it is still your IP address, then the configuration didn’t go through. Else, you should see the IP assigned by the configured proxy.
Proxy in Wi-Fi Configuration for Android
Configuration in Android is like macOS in the sense that you configure for each individual Wi-Fi you connect to.
Step 1: Navigate to ‘Network & Internet’ in the settings area and choose ‘Wi-Fi’.
Step 2: Wait until you can see the Wi-Fi you want to set a proxy for. Tap and hold for a few seconds until some options come up. Choose the “Modify Network” option and tap “Proxy” then choose “Manual”.

Step 3: Enter the proxy details obtained from the Proxy-Seller or any other provider of your choice. The details you should enter are the proxy address and port. I recommend leaving the username and password blank even if that is your authentication method. This is because you will be prompted to provide them regardless.
Step 4: Save the configuration and test the proxy on IPinfo.io in other to verify the IP address that will be discovered. If you can still see your IP address, then the setting didn’t work.
Proxy in Wi-Fi Configuration for iOS
Step 1: Go to the Settings area and tap the Wi-Fi option.
Step 2: In the interface that opens, you will see the list of available Wi-Fi networks and the one you are connected to.

Step 3: Tap on the one you are connected to and scroll to the bottom of the page, you will see the ‘HTTP Proxy’ option set to ‘off’.
Step 4: Click on it and set it to ‘Manual’. This will reveal the forms to enter the proxy server address and port.
Step 5: Enter the proxy address in the server section and the proxy port in the port section
Step 6: Once you are done, you can click the ‘Save’ button at the top-right side of the page.
Head over to IPinfo.io to verify the IP address discovered by web services. If it is a different IP address
Conclusion
As a way of concluding this article, it is important you know that it is better you don’t use a proxy than to use a bad one as bad proxies will expose you to security, privacy, and performance risks. Proxy-Seller offers ISP proxies that are premium, fast, and undetectable to web services.
You can use it without any noticeable lag in speed and the proxies are from a reputable provider. Make sure you purchase for the location you want to appear to be accessing the web from. Take, for instance, if you need to appear as a US-based user, purchase a US IP address.