Are you a developer yet to understand how to make HTTP requests in Node.js with Fetch API? In this article, you will learn what Fetch API is and how to set up an HTTP request in Node.js with Fetch API.

As the growth in tech is getting diverse, knowing how to use HTTP in Node.js becomes paramount. HTTP is an abbreviated term for Hypertext Transfer Protocol. As a developer, you would agree with me that most of the communication on the web happens through HTTP requests. Therefore, having the good insight that HTTP helps in the receiving and sending of data makes it more important to know how HTTP requests work in Node.js.
Node.js can generate dynamic page content and create, open, read, write, delete, and even close files on the server. Also, it can collect, add, and modify data in your database. Node.js eliminates the waiting and continues with the next request. Hence, it creates an avenue for you as a developer who wants to build a robust and dynamic web application that will be responsive.
Node.js runs asynchronous programming, and most importantly, it has an inbuilt HTTP module HTTP, which allows the transfer of data. However, the Fetch API makes this data transfer and receiving of these data more flexible and easier. In this article, you will learn how to make HTTP requests in Node.js with fetch API. Before then, let’s look at what Fetch API is.
What is Fetch API

Fetch API is a JavaScript programming interface that allows the running of asynchronous HTTP requests such as GET, POST, PUT, or DELETE. It is a simpler method of fetching resources from the web server. It is built in modern browsers and does not call for any additional libraries to use. Fetch API was launched in 2015 to be a replacement for XMLHttpRequest which is a callback-based API. However, the uniqueness that sets the Fetch API above XMLHttpRequest is the fact that Fetch has a standard that leverages its Promise. This further enables the elimination of callback hell and results in a cleaner code.
Even though Fetch API was available in all major browsers, before now, it was not enabled in the previous version of Node.js. To use fetch(), developers need to install npm (Node Package Manager) node fetch features. Also, third parties like Axios and Node-fetch were required to help them create server-side code. Not until 2022 that the updated version of Node.js (v 17.5) added experimental support without requiring additional libraries for using the Fetch API. With the new version, developers can easily write code and have a quick response to the request.
Here is a simple example of how the basic Fetch API call looks like
async function fetchExample() {

  const response = await fetch('https://api.example.com/data');

  const data = await response.json();

  console.log(data);

}
Remember that the fetch method returns a promise that resolves to a response. In this example, we define an asynchronous function fetchExample that makes a GET request to the URL https://api.example.com/data using the fetch method. The await keyword is used to wait for the response to be returned before continuing execution. Once the response is received, we parse the JSON data using the JSON method and log it to the console. The JSON method is called on the Response object to parse the JSON data.
Benefits of Fetch API

Looking at the advancement in Node.js in terms of Fetch API, let’s dive into some of the beneficial attributes of this improvement.
- Fetch API Has Faster Implementation: Due to the upgrade in the new version of Node.js, its Fetch API implementation is built on top of Undici. This happens to be an HTTP client but the main distinct of this Undici is its speed. As such, the Node.js Fetch API is very fast and stable.
- No Need for Additional Library: Before Fetch API becomes a full functionality in Node.js, the previous versions need Node Package Manager (NPM) to enable fetch. Now it has a Configured Node Module. So, there is no need for third-party packages such as Node-Fetch, or several others that can perform this function.
- Fetch API Enable Simpler Code: By leveraging the built-in fetch() function in Node.js, developers who have previously used the Fetch API will be happier with the advancement. Since, the Fetch API is promise-based, allowing for a simpler and cleaner code is viable while still avoiding callback hell.
- Better Way of Handling Bugs or Errors: Fetch API is built to replace XMLHttpRequest. Therefore, it provides a more consistent way of handling errors compared to XMLHttpRequest and any other that was used before now.
- Fetch API Has a Flexible Syntax: The syntax of Fetch API is way more flexible than traditional methods like XMLHttpRequest. This is so because it uses promises to handle asynchronous operations instead of callbacks. This further allows simplicity in interpreting code by other developers.
Setting Up Fetch API in Node.js
Fetch API has a programming interface for making HTTP requests look similar to XMLHttpRequest. But they are not alike, Fetch API is powerful and flexible compared to XML. In this part of the article, we will show you how you can set up Fetch API in a Node.js environment. To get started with Fetch API in Node.js, the first step is
Step 1: Install Node-Fetch using npm or yarn. Simple write this code
npm install node-fetch
Step 2: Thejs file requires the node-fetch module
const fetch = require('node-fetch');
Step 3: After that, use the fetch() function to make HTTP requests. Make a GET, POST, PUT, and DELETE request by writing this code:
fetch('https://api.example.com/data')

  .then(response => response.json())

  .then(data => console.log(data))

  .catch(error => console.error('Error:', error));
Step 4: for any of the requests (POST, PUT, DELETE) you can pass an options object as the second argument to fetch(). Let's write a code for a POST request with JSON data for example
const postData = {

  key: 'value'

};

fetch('https://api.example.com/data', {

  method: 'POST',

  headers: {

    'Content-Type': 'application/json'

  },

  body: JSON.stringify(postData)

})

.then(response => response.json())

.then(data => console.log(data))

.catch(error => console.error('Error:', error));
In the codes above, fetch() returns a Promise that resolves to the Response object representing the response to the request. You can then use .json() to parse the JSON data or other methods preferable to handle different response types. To handle errors use .catch() to avoid promise rejections.
This is how you can use the Fetch API in a Node.js environment.
Making HTTP Request in Node.js with Fetch API

Making an HTTP request with Fetch API in Node.js is an easy and well-organized way to retrieve data from any website. To make this HTTP request, you can use the node-fetch package. The module will allow you to use the fetch() function in Node.js, with very similar functionality as window.fetch() in native JavaScript, but with a few differences.
Let’s perform a GET request to Google’s home page:
const fetch = require('node-fetch');

fetch('https://google.com')

  .then(res => res.text())

  .then(text => console.log(text));
The function returns a Response object that contains useful functions and information about the HTTP response, such as:
- text(): returns the response body as a string.
- json(): parses the response body into a JSON object, and throws an error if the body can’t be parsed.
- status and statusText: contains information about the HTTP status code.
- ok: equals true if the status is a 200 status code (a successful request).
- headers: an object containing response headers, a specific header can be accessed using the get() function
To perform a POST request, you need to pass an object with the request options as the second parameter to the fetch() function. The options object should contain the method property set to ‘POST', the headers property set to an object containing the request headers, and the body property set to the request body. T
Take a look at how to make a POST request to a server:
fetch('https://example.com/api', {

  method: 'POST',

  headers: {

    'Content-Type': 'application/json'

  },

  body: JSON.stringify({

    name: 'Jason Mark',

    email: '[email protected]'

  })

})

  .then(res => res.json())

  .then(data => console.log(data));
To perform a PUT request is similar to making a POST request. Here is an example.
const response = await fetch("https://example.com/api/v1/users", {

  method: "PUT",

  credentials: "include",

  headers: {

    "Content-Type": "application/json",

  },

  body: JSON.stringify({

    username: "jones-zoey",

    email: "[email protected]"

    role: "regular-user",

    age: 25,

    birthplace: "New York",

  }),

})
To make a DELETE request, you need to pass an object with the request options as the second parameter to the fetch() function. The options object should contain the method property set to ‘DELETE'.
Here is an example of how to make a DELETE request to a server:
fetch('https://example.com/api/31', {

  method: 'DELETE'

})

  .then(res => res.json())

  .then(data => console.log(data));
Handling Error Responses from HTTP Request
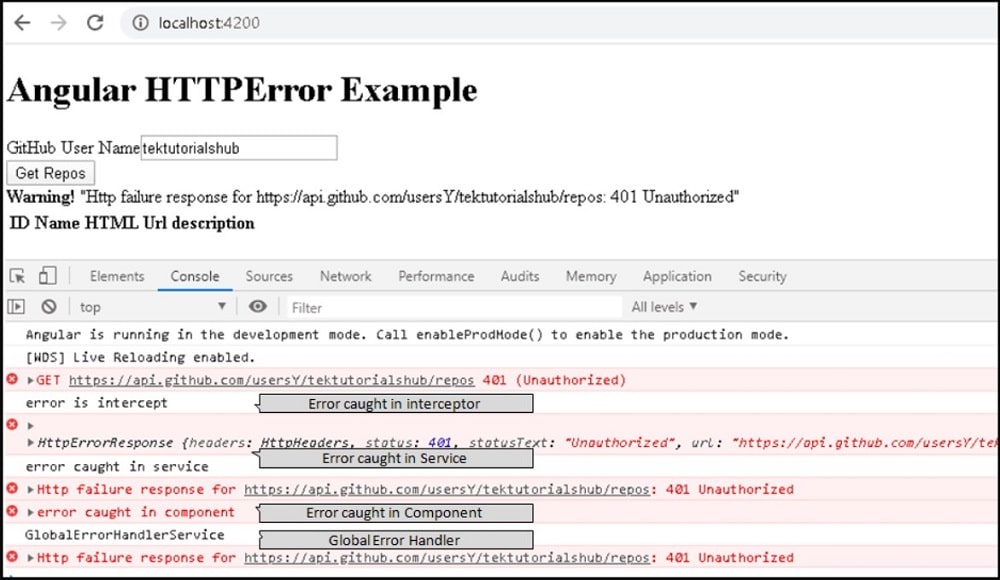
Error is a common factor in any code, as such, debugging is the perfect solution to solve the errors. When making an HTTP request using Fetch API, the errors that can arise are HTTP status codes like error 404 Not Found or 500 Internal Server Error. However, debugging these errors calls for a response.
Here's an example using HttpURLConnection:
try {

    // Make your HTTP request

    int responseCode = connection.getResponseCode();

    if (responseCode == HttpURLConnection.HTTP_OK) {

        // Handle successful response

    } else {

        // Handle error response

        // You can get more details from the error stream

        InputStream errorStream = connection.getErrorStream();

        // Read the error stream and handle it accordingly

    }

} catch (IOException e) {

    // Handle general IO exceptions

    e.printStackTrace();

}
If you are using a library like Retrofit, error handling is done through the callback or by defining error models. Take note that, the code can be adjusted to your precise use case and the HTTP library that you are using.
Here's an example using Retrofit:
Call<MyResponseModel> call = apiService.makeRequest();

call.enqueue(new Callback<MyResponseModel>() {

    @Override

    public void onResponse(Call<MyResponseModel> call, Response<MyResponseModel> response) {

        if (response.isSuccessful()) {

            // Handle successful response

        } else {

            // Handle error response

            // You can get more details from response.errorBody()

            try {

                String errorBody = response.errorBody().string();

                // Parse and handle the error body accordingly

            } catch (IOException e) {

                e.printStackTrace();

            }

        }

    }

    @Override

    public void onFailure(Call<MyResponseModel> call, Throwable t) {

        // Handle network failures or exceptions

        t.printStackTrace();

    }

});
FAQs
Q. Why is HTTP Request Important?
The reason why HTTP request is paramount is that it is truly important in any web communication. It is one interaction the web cannot bypass without jinxing proper responses. HTTP request is important because it enables the sending and receiving of data from different web sources. As a developer, making HTTP requests is the livewire of accessing several websites, parsing them, and saving them in your database. Without this HTTP request such cannot be achieved. The good that comes with every step of this is that it helps a developer to be dynamic in building a responsive web application and environment.
Q. What is the Difference Between AXIOS and Fetch API?
Oftentimes, the difference between AXIOS and Fetch API has been a question that always arises. The hidden truth behind these two Node package is that they are both popular. They are used for making GET and POST HTTP requests easily and interestingly, they both produce the same output. Due to the modernization of the Fetch API, the difference might be clear, hence, to answer your question, the core difference between the Fetch API and AXIOS is that, while Fetch API uses the body property of a request, AXIOS uses the data property. Fetch API does not allow other libraries, while AXIOS embrace third-party package.
AXIOS uses and sends JSON data directly, while Fetch API must convert it to string first to send and also call for response.json() function first before JSON format can be initiated. Additionally, since AXIOS majorly works with data, variable names must be in the data. While Fetch API does not have such, variable names can be called anything. There are other differences, but these are the core obvious ones.
Q. How do I Send a POST Request with Fetch API?
Sending POST requests is very straightforward. To make a POST request, firstly, the configuration object needs to be added to the fetch() function. Then the object should include the HTTP POST method to the data you want to send. All these will be in the body of the request. After that, the data will be extracted from the HTML to make the code that will then be submitted through a POST request. POST and GET requests are very common in making HTTP requests, thus, learning how to send these two requests will not be difficult across vast developers with diverse knowledge.
Conclusion
Fetch API has been a modernization of XMLHttpRequest. Before now, it was not a feature that had its stand in Node.js and to use it always arose the calling of third-party packages. However, as of the time of writing this article, the Fetch API has been experimental in Node.js as an addition that comes with the Node.js new version 17.5 or what some simply call Node.js version 18.
Knowing how important the communication of HTTP requests is in any web application, in this writing, we have covered quite interesting part of what Fetch API is, its benefits, basic ways to set up Fetch API in Node.js as well as making different HTPP requests in Node.js with Fetch API. Take your time to have a good read. Don’t miss out on what is packed in this article.