Do you know how important building a proxy node is to help boost the security and privacy of your network requests? In this article, we have outlined why you should use a proxy node and how to build one.

In today's world of technology, building a Proxy Node is a good way to ensure online security and privacy. To understand the importance of this proxy node, create its avenue in your network setup to help forward requests to different endpoints and servers. However, while its implementation is crucial, what is this Proxy Node, and how do you build one for your network?
What is Proxy Node?
Proxy Node acts as an intermediary between your device and the internet. If you understand how a proxy server works, you have no issues getting the basic functionalities of Proxy Node. It processes requests, making it seem like they originate from the proxy server rather than your device. As a result, mask your real IP address, and boost your online anonymity.
In this article, we will explore more on why you should use a proxy node and how to ignite the codes to build one, as well as the prerequisite approaches it requires. Before we proceed, let’s look at how a Proxy Node works.
How Proxy Nodes Works
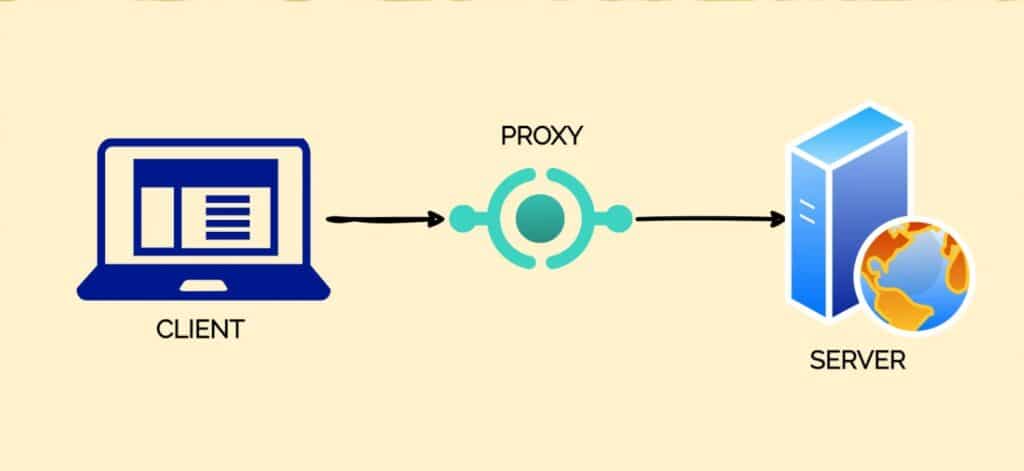
The way a proxy node works is quite direct. Proxy nodes work by intercepting requests from clients or simply your device and forwarding them to specific servers or endpoints. The server's response is then sent back to the proxy node, which, in turn, delivers it to your device.
Why Proxy Node

The reason for creating and using a proxy node outlines the benefits it brings to safeguarding your request. This flows back and forth from a client to an endpoint or server within a specific network. Some of the benefits of building a proxy node include:
-
Improved Network Performance
Proxy nodes can frequently cache already accessed content, reducing the load on your network and speeding up your browsing time. This caching power will further enhance network performance, especially while running a task that is bandwidth-intensive.
-
Access to Restricted Content
proxy nodes can be used to bypass restrictions on location where certain websites or content are controlled and not allowed, thus, granting you access to internet transparency.
-
Serving as a Load Balancer
It will optimize your network and set activities on autopilot to enable quick response time. This further reduces network latency and enhances the performance level of applications.
-
Enhanced Security and Privacy
The valuable nature of internet protocols makes the creation of proxy nodes crucial. This is because it will serve as a shield to encrypt your online activities as well as your original IP address. In addition to providing a secure pathway for your data, protecting it from cyber threats.
How to Building a Proxy Node: Step-by-Step Guide

Before creating a proxy node, there are some things as a prerequisite that should be in place or installed into your device. By prerequisite sure tells you they are requirements, hence, they are a must and not optional. You have to select the right server and node based on the location, speed, and security. This is significant to aid installation, reliability, and compatibility. A code editor, interpreter, or compiler like Visual Studio Code among others. Also, a Postman to help test the requests and read the responses. Now, let’s build a Node.js proxy server using HTTP-proxy middleware.
Step 1: Install Node.js on your system or download it from the website js.
Step 2: Initialize npm
Run the command: npm init -y
PS C:\Users\USER> npm init -y
Write to C:\Users\USER\package.json:
{

  "name": "user",

  "version": "1.0.0",

  "description": "",

  "main": "index.js",

  "scripts": {

    "test": "echo \"Error: no test specified\" && exit 1"

  },

  "keywords": [ ],

  "author": "",

  "license": "ISC"

}
Step 3: Install express and HTTP-proxy-middleware as a proxy framework, dotenv to load variables, and morgan to log the requests and give responses. Run this command to install the packages outlined: npm install express HTTP-proxy-middleware dotenv morgan
Step 4: After installing the required package, now create an app.js file and write the code sending a request to a client.
const express = require('express');

const { createProxyMiddleware } = require('http-proxy-middleware');

const app = express( );

const PORT = 3000;

// Define the proxy middleware options

const proxyOptions = {

  target: 'http://client-url.com', // Client's URL where you want to send requests

  changeOrigin: true,

  pathRewrite: {

    '^/client': '/' // Rewrite /client to the root path of the client's URL

  },

  onProxyRes: function (proxyRes, req, res) {

    // You can modify the proxy response here if needed

  }

};

// Create the proxy middleware

const clientProxy = createProxyMiddleware('/client', proxyOptions);

// Use the proxy middleware for requests matching /client route

app.use('/client', clientProxy);

// Start the Express server

app.listen(PORT, () => {

  console.log(`Proxy server is running on port ${PORT}`);

});
In this code, the proxy server listens on port 3000 and forwards any requests to ‘/client’ to the target client's URL. You can modify the ‘proxyOptions’ object to include additional configuration options as needed.
Step 5: To start the application, run the proxy server, and execute the following command in your terminal:
node proxy.js
Here is an example of a simple client-server setup using Node.js. create a client name ‘client.js’
// client.js

const express = require('express');

const app = express();

const PORT = 4000;

app.get('/data', (req, res) => {

  res.json({ message: 'Hello from the client!' });

});

app.listen(PORT, () => {

  console.log(`Client server is running on port ${PORT}`);

});

In this code, the client server listens on port 4000 and responds with a JSON message when you access the /data route.

Also, let's create the proxy server. Create a file called proxy.js:

// proxy.js

const express = require('express');

const { createProxyMiddleware } = require('http-proxy-middleware');

const app = express();

const PORT = 3000;

// Define the proxy middleware options

const proxyOptions = {

  target: 'http://localhost:4000', // Client server's URL

  changeOrigin: true,

  pathRewrite: {

    '^/client': '/data' // Rewrite /client to /data in the client server

  }

};

// Create the proxy middleware

const clientProxy = createProxyMiddleware('/client', proxyOptions);

// Use the proxy middleware for requests matching /client route

app.use('/client', clientProxy);

// Start the Express server

app.listen(PORT, () => {

  console.log(`Proxy server is running on port ${PORT}`);

});
In this code, the proxy server listens on port 3000 and forwards requests from /client to the client server's /data endpoint.
To run the servers, open two terminal windows, one for the client-server and one for the proxy server. In the terminal where client.js is located, run: Node client.js, and In the terminal where proxy.js is located, run: Node proxy.js
Now, you can access the client's data through the proxy server by requesting http://localhost:3000/client. The request will be forwarded to the client-server, and you'll receive the response.
Now, your Node.js proxy server is running and ready to forward requests to the client's URL.
Step 6: After everything, then go to Postman to send a request. Visit ‘http://localhost:3000/client’ to send requests and access resources from the client. This does not only apply to this local host; the Postman test can be done at any request.
FAQS
Q. Is Proxy Node Legal to Use?
When it comes to Proxy Node, its legality is based on the specific laws of the user's country. In most regions, using a Proxy Node for security and personal privacy online is considered highly legal. Always keep in mind that it is essential to respect copyright laws and terms of service agreements when accessing content through a Proxy Node to avoid legal implications from the authorization location and content you are trying to bypass and have access to. However, to answer your question, yes, using a proxy node is legal.
Q. What Are the Most Common Uses Cases of Proxy Nodes?
There are several use cases when it comes to Proxy Nodes. Just like a proxy serves as an intermediary to mask of your confidentiality online, a proxy node can do that and more. Proxy Node is commonly used to improve online privacy and security, bypass geo-restrictions, and access blocked content. They are also utilized in corporate networks to control and monitor employees' internet usage, ensuring a safe and efficient work environment. By routing traffic through a Proxy Node, users can browse anonymously, protecting their sensitive information from hackers and surveillance. This, among several use cases and benefits, has been discussed in the article. As someone into tech, if you have the financial buoyancy, building a proxy node should not be an option by a must.
Q. How Do I Set Up and Configure a Proxy Node?
Setting up a Proxy Node is quite direct and flexible. One thing to note is that it is crucial to follow the provider's guidelines and documentation for a seamless setup process. Make sure to outsource or select a reliable and competent provider. Configuring your device or network settings to use the proxy and ensuring proper security measures. The precise steps to follow in setting up vary by different proxy type, your device type, and the application you want to configure. If all these are in place, then you are good to go.
Conclusion
A proxy node is one rock-solid way of providing a significant shield for your network. As such, understanding how to integrate a proxy node as an intermediary into your network will help enhance your online security and anonymity. In this article, we have walked you through why you should create a proxy node and how you can build one.